Hæklenål: 4 mm Garn: 60 g sport/fine, uld/viskose. ca. 50 g = 140 m Masker: fastmasker i bagerste maskeled
Hækl 52 hstgm ved hjælp af luftmaskefri start, vend med 1 lm (vendemaske) Hækl 1 fm i hver maske i bagerste maskeled indtil du har 50 rk, altid med 1 lm at vende på, første maske hækles i sidste maske fra rækken før – fold på langs. Hækl 1 kædemaske i hver m i bagerste maskeled af begge masker. Bryd garnet af
Hook: 4 mm Yarn: 60 g of sport/fine, wool/viscose, approx. 50 g = 140 m. Stitches: single crochet in back loop
Make 52 hdc in chainless foundation, ch 1 (turning chain) Make 1 sc in every stitch in the back loop until you have 50 rows, always turning over with 1 chain, crocheting the first stitch in the last stitch of the previous row – then fold in half on the long end. Slip stitch through the back loops on every stitch. Break off.
Denmark is a small and flat country – the highest point is situated 172 meters above sea levels, this means that everything feels very within reach, small and cosy. With the big nordic countries surrounding us and protecting us to the East, England to the West and the rest of Europe to the South it makes this place feel like a cosy oasis.
t will take you less than 1 hour to reach the shore, no matter where you are. It is especially noticable how small the country feels after being in a country with mountains. Not being able to see that far, gives you a feeling of comfort – everything you need is within close reach and I think that is why in the olden days community feeling with those living close to us, was strong.
Our argiculture has always been a part of our country, with 60% of the land being used for crop fields but we also have a lot of forest – about 625.000 hectare.
Nature is a big part of our culture and when you look into poetry, novels and songs it is a recurring theme along with a love for our country and our language, which is not spoken anywhere else.
Hygge – the Danish word for having a cosy, warm and/or social time can also be transferred to your fashion style. Especially using crochet items for comfort and unique self-expression as well as some tips you’ll learn how to incorporate the hygge lifestyle into your life. It’s all about being comfortable, down-to-earth and minimalistic, however that feels to you.
A great thing about Denmark and fashion is that even though many go for simple styles, it is not unusual to see someone with their own unique style expression. Even though we are known for our clean, minimalistic furniture, fashion and architecture and even though we Danes can be reserved you still see many different styles in the streets and there is this part of our culture – hygge – that is still so deep in our veins and lifestyle, that we will always have this element of a cosy, old-timey and warm feeling. No matter if you go for neutral or colorful clothes – hygge can always be a part of it. So let’s get into it!
All the sweaters: Neutral, colorful, ribbed, mesh or oversized
Danes are often seen in timeless, neutral pieces, minimalistic clothing and often looking both comfortable and stylish. You’ll see families going for walks in the city with practical boots, puffer jackets or Nordic sweaters, fleece jackets or long or big coats are also quite common. Sweaters are an important stable as it keeps you warm and can go with jeans, skirts or over a dress.
Denim is timeless and goes with everything and ribbed clothes is also classy and timeless. Pair a ribbed neutral top with an oversized blazer in dark blue or black (look in the Men’s section at a secondhand shop) or a comfy cardigan in another blue shade. Go for simple jewelry like silver or gold, a simple chain or two around the neck or some elegant earrings or studs.
A splash of color
Pink is rarely seen in the streets, most people – especially in Copenhagen – wear black or beige. But if you are into colors go for a simple short or long sleeved top, a skirt or a pair of flared leggings, then add a colorful crochet rose on the top or throw a colorful crochet poncho over the outfit – comfy and easy while still being very stylish. Choosing 1 color or just 1 colorful item with an otherwise neutral outfit keeps it looking simple and not overdone.
You don’t see much crochet clothes out in public (mostly it’s crochet bags)– here is where I come in. I focus on adding that unique element to an otherwise often genderless and a bland palette. So if you’re someone who wants to stand out, like dressing uniquely and in your own style then combining crochet with Danish style is right up your alley.
Materials & fabrics
Danes love quality. So in terms of clothing, go for comfy and natural fabrics: wool, cotton, viscose .- so your skin can breathe. Something you see a lot is when someone haves a child, what the child wears becomes extremely important. Many babies sleep in their strollers in the garden, on the terasse, backward or outside a café (even in winter) so it’s crucial that the baby is warm but not gets overheated (polyester is the worst for this!). Many will use cotton and wool has natural both warming and cooling effects as well.
1 blue item, 1 white top, 1 neutral tote
Pair a blue item (could be denim) with a tank top, sweater or t-shirt and a beige colored tote to carry your belongings. I think blue is also a quite neutral color, it leads your thoughts to denim – a durable and practical fabric that in style and color goes with anything. Here you can keep the color palette neutral without looking to beige-ish.
Neutral tones and ribbed clothes
Add one item of color to break the palette a bit or keep it completely neutral if you prefer. Crochet clothes in rib stitches is great for both comfort and style and it goes with almost anything. You can also try arib crochet skirt.
Hygge – A Danish concept Hygge, both a noun and an adjective, doesn’t have a direct translation but is a very Danish thing that is used not only in terms of our lifestyle but just as much our food, clothes and interior. It can translate to feeling cosy, warm, comfortable and relaxed. All in all it’s about bringing that cosiness, warmth and light into your life, specially the darker months (it seems dark in the North like half of the year).
Here’s how you can bring some hygge into your life:
light a candle or use warm lighting
drink something warm
eat something comfy and delicious
bake or cook some comfort food
be with loved ones or hug a pet or a teddy
put plans on hold and take time to just be
watch something you really enjoy
cosy up under blankets or a duvet
wear something comfortable
crochet something – or use your hands for a cosy craft
Beaches in Denmark
You can’t say Danish or Denmark without saying beaches.. Cause there is something so magical about the Danish beaches – they are very cosy and realxing, often with natural surroundings like sand dunes, rose hip bushes and small cliffs where swallows fly low before the rains. On these natural beaches you’ll often find snarls and reeds and many beaches I have gone to also have a forest nearby. When you go into the dark forest after being in the sun all day, it feels very dream-like and a special kind of peace is found in there, a contrast to the open, bright and sunny beach. You go from constant sound of waves to complete quietness.
In the summer, when I was a child, me and my family would take trips to the beach – often for (what felt like) an entire day. In the morning we would prep a big Danish lunch (smørrebrød with fresh toppings like cooked potato, mayo, onion, radishes, cherry tomatoes, carrot sticks, fresh chives etc) to take with us, and eat on a big blanket on the sand in our bathing suits with wet hair and the sun on our skin. I remember that I would always exfoliate my skin with the sand while in the water or float fon my back with ears under water and listen to the sound of water trickeling on the small rocks beneath. It’s not just a swim, it’s taking care of body and mind and existing in an envioronment where you can let go, not have to do anything other than let the water carry you, the sun charge you, the food nourish you and the sound of the waves calm you. It’s a holistic health practise. And it doesn’t stop at beaches, many Danes love nature – whether it be parks or woods or going to one of the many cemeteries to chill on the grass.
On my last beach trip I brought a crochet project & finished the day with an open faced fresh sandwich (smørrebrød), a stable in Danish cuisine
Going to the beach as a Dane is something that many people not only do in summer but in winter too. Some will swim in the harbour and do cold plunges to keep their health in check. So no matter what kind of beach-goer you are, it is an ingrained part of Danish culture and a way for us to wind down and take a break and care for ourselves.
Beaches in Denmark to me smells like fresh salt water, rose hip and warm sand.
Danish nature
We love nature and nature is a part of our daily life – even when living in the cities. Many bike through parks and cemeteries and we even have a bike path called “the green path” in Copenhagen that leads you quickly and effectively away from traffic and through the city, past trees and kolonihavehuse. Nature is a part of our health and well-being, both in terms of exercising outdoors in summer and winter, going for walks in the weekends with a to-go coffee, going camping or sitting by the ocean or the lakes and looking at the water. It is not only about movement in nature but also about relaxing, getting natural stimuli from the colors and sounds and sensations of walking or sitting on the earth. If you want a more hygge vibe in nature, make a picnic with a blanket and some light food, you could also bring a deck of card or your crochet project.
Denmarks romanticism
In both art and arciteture romanticism lives on in Denmark – from the famous Skagen Painters (Skagemalerne) to the beautiful old houses that you’ll find in all towns and cities, there is this cosy and old-time-vibe. Just go for a stroll in the oldest part of Copenhagen and be mesmerized by the crooked and colorful houses, used for living or as shops or go to Bakkehuset – an old museum house where some of the most famous Danish writers and poets used to visit, take a trip to Søndermarken or to our two amusement parks – Bakken and Tivoli – number 1 and 2 oldest amusement parks in the world, and you’ll get the idea of how much Danes appreciate history, tradition, cosiness and… well, fun!
Hvis du har mulighed for det, kan du donere et lille eller stort beløb, som tak:
HVAD ER DET? En hækleopskrift til et par korte, ribbede og enkle hæklede bukser med elastik i taljen. Der er mindre stof omkring taljen for at skabe et mere tætsiddende og figursyet look. Fra hoften og ned er benene lige. Du kan stoppe med at forbinde siderne for at lave slidser. Mål altid din første række mod din krop. Og mål undervejs.
Når du måler din fulde længde (“mål 1”), skal du måle fra talje til ankel. Hvis du ønsker en almindelig længde, skal du tilføje ca. 5 cm til målet.
Opskriften følger målene og har et proces-foto, der viser, hvordan panelerne ser ud individuelt, og hvordan de er sat sammen.
Bukserne er lavet i 4 paneler og derefter syet eller hæklet sammen i enden. Bagsiden er større end forsiden. Hvis din talje er større end eller tættere på dit hoftemål, foreslår jeg, at du laver Daphne-bukserne i stedet – som er lige.
MATERIALER
Elastik. 3 cm bred. Måler din talje minus ca. 5 cm. 3 mm hæklenål Bomuld/bambusblanding Størrelse 2/sport/baby Garnlængde: 50 g = 118 m.
Jeg brugte 1400 m (593 g) til min størrelse “medium” (længde: 79 cm, hofte: 104 cm). Tilføj/fjern 117 m (75 g) for hver størrelse (4 cm i omkreds, 2 cm i længden) op/ned.
If you are able to, you can donate small or big amounts to say thanks for the pattern, this way I can continue to share free patterns:
WHAT IS IT A crochet pattern for a pair of cropped, ribbed and simple crochet pants with elastic waist. There is less fabric around the waist area to create a smoother look. From the hip down the leg is straight. You can stop connecting the sides to create side slits. Always measure your first row against your body. And measure as you go.
When you measure your full length (“measurement 1”) you need to measure from waist to ankle. If you want a regular length you will need to add approx. 5 cm.
The pattern follows measurements and has a process photo showing how the panels look individually and how they are put together.
The pants are made in 4 panels and then sewn or crocheted together at the end. The back is bigger than the front, if your waist is bigger than or more close to to your hip measurement, I suggest you make the Daphne pants instead – which are straight.
MATERIAL Elastic band. 3 cm wide. Measuring your waist minus about 5 cm. 3 mm hook Cotton/bamboo blend Size 2/sport/baby Yardage: 50 g = 118 m.
I used 1400 m (593 g) for my size “medium” (length: 79 cm, hip: 104 cm). Add/remove 117 m (75 g) for each size (4 cm in circumference, 2 cm in length) going up/down.
Hvis du har mulighed for det, kan du donere et lille eller stort beløb, som tak:
HVAD ER DET? En hækleopskrift på, hvordan man hækler en top med diamantformede stropper, trrekantede bh-skåle og stropper bundet på ryggen – enten krydset eller åben. Med i opskriften får du også en video (13 min., med engelsk voiceover), der viser hele processen fra start til slut. Så den er også god til begyndere. Hvis du vil lære mere om, hvordan du laver dit eget design, vil dette også hjælpe dig med at vise dig, hvordan du måler til dit design.
MATERIALE 3 mm hæklenål Bomuldsgarn, størrelse 8/4 (reklamelink) Jeg brugte 70 gram til min størrelse “small” (lilla top) – hvad der svarer til størrelse B-skål og 70 cm i taljen. (Den stribede top svarer til en C-skål).
Læg ca. 25 gram til/fra for hver størrelse (4 cm i omkreds, 2 cm i længde) du går op/ned.
STØRRELSE Toppen laves efter mål. Du vil blive guidet i, hvordan og hvor du skal måle, og hvordan du bruger målene i opskriften.
If you are able to, you can donate small or big amounts to say thanks for the pattern, this way I can continue to share free patterns:
WHAT IS IT A crochet pattern on how to crochet a top with triangle bra cups and straps tied on the back – either crossed or open. You will recieve the whole written pattern + a video tutorial (13 min, with English voice over) showing the whole process from beginning to end. So this is great for beginners too.
If you want to learn more about how to make your own design, this will also help you in showing you how to measure for your design.
MATERIAL 3 mm hook Cotton yarn, size 1 (superfine), Brand: Mayflower (affiliate) 70 grams for my size “small” (lilac top) – what is equivalent to size B-cup and 70 cm in waist. (The striped top is equivalent to a C cup).
Add/subtract 25 grams for each size (4 cm in circumference, 2 cm in length) going up/down.
SIZE The top is made after measurements. You will be guided in how and where to measure and how to use the measurement in the pattern. It’s very easy and straight-forward.
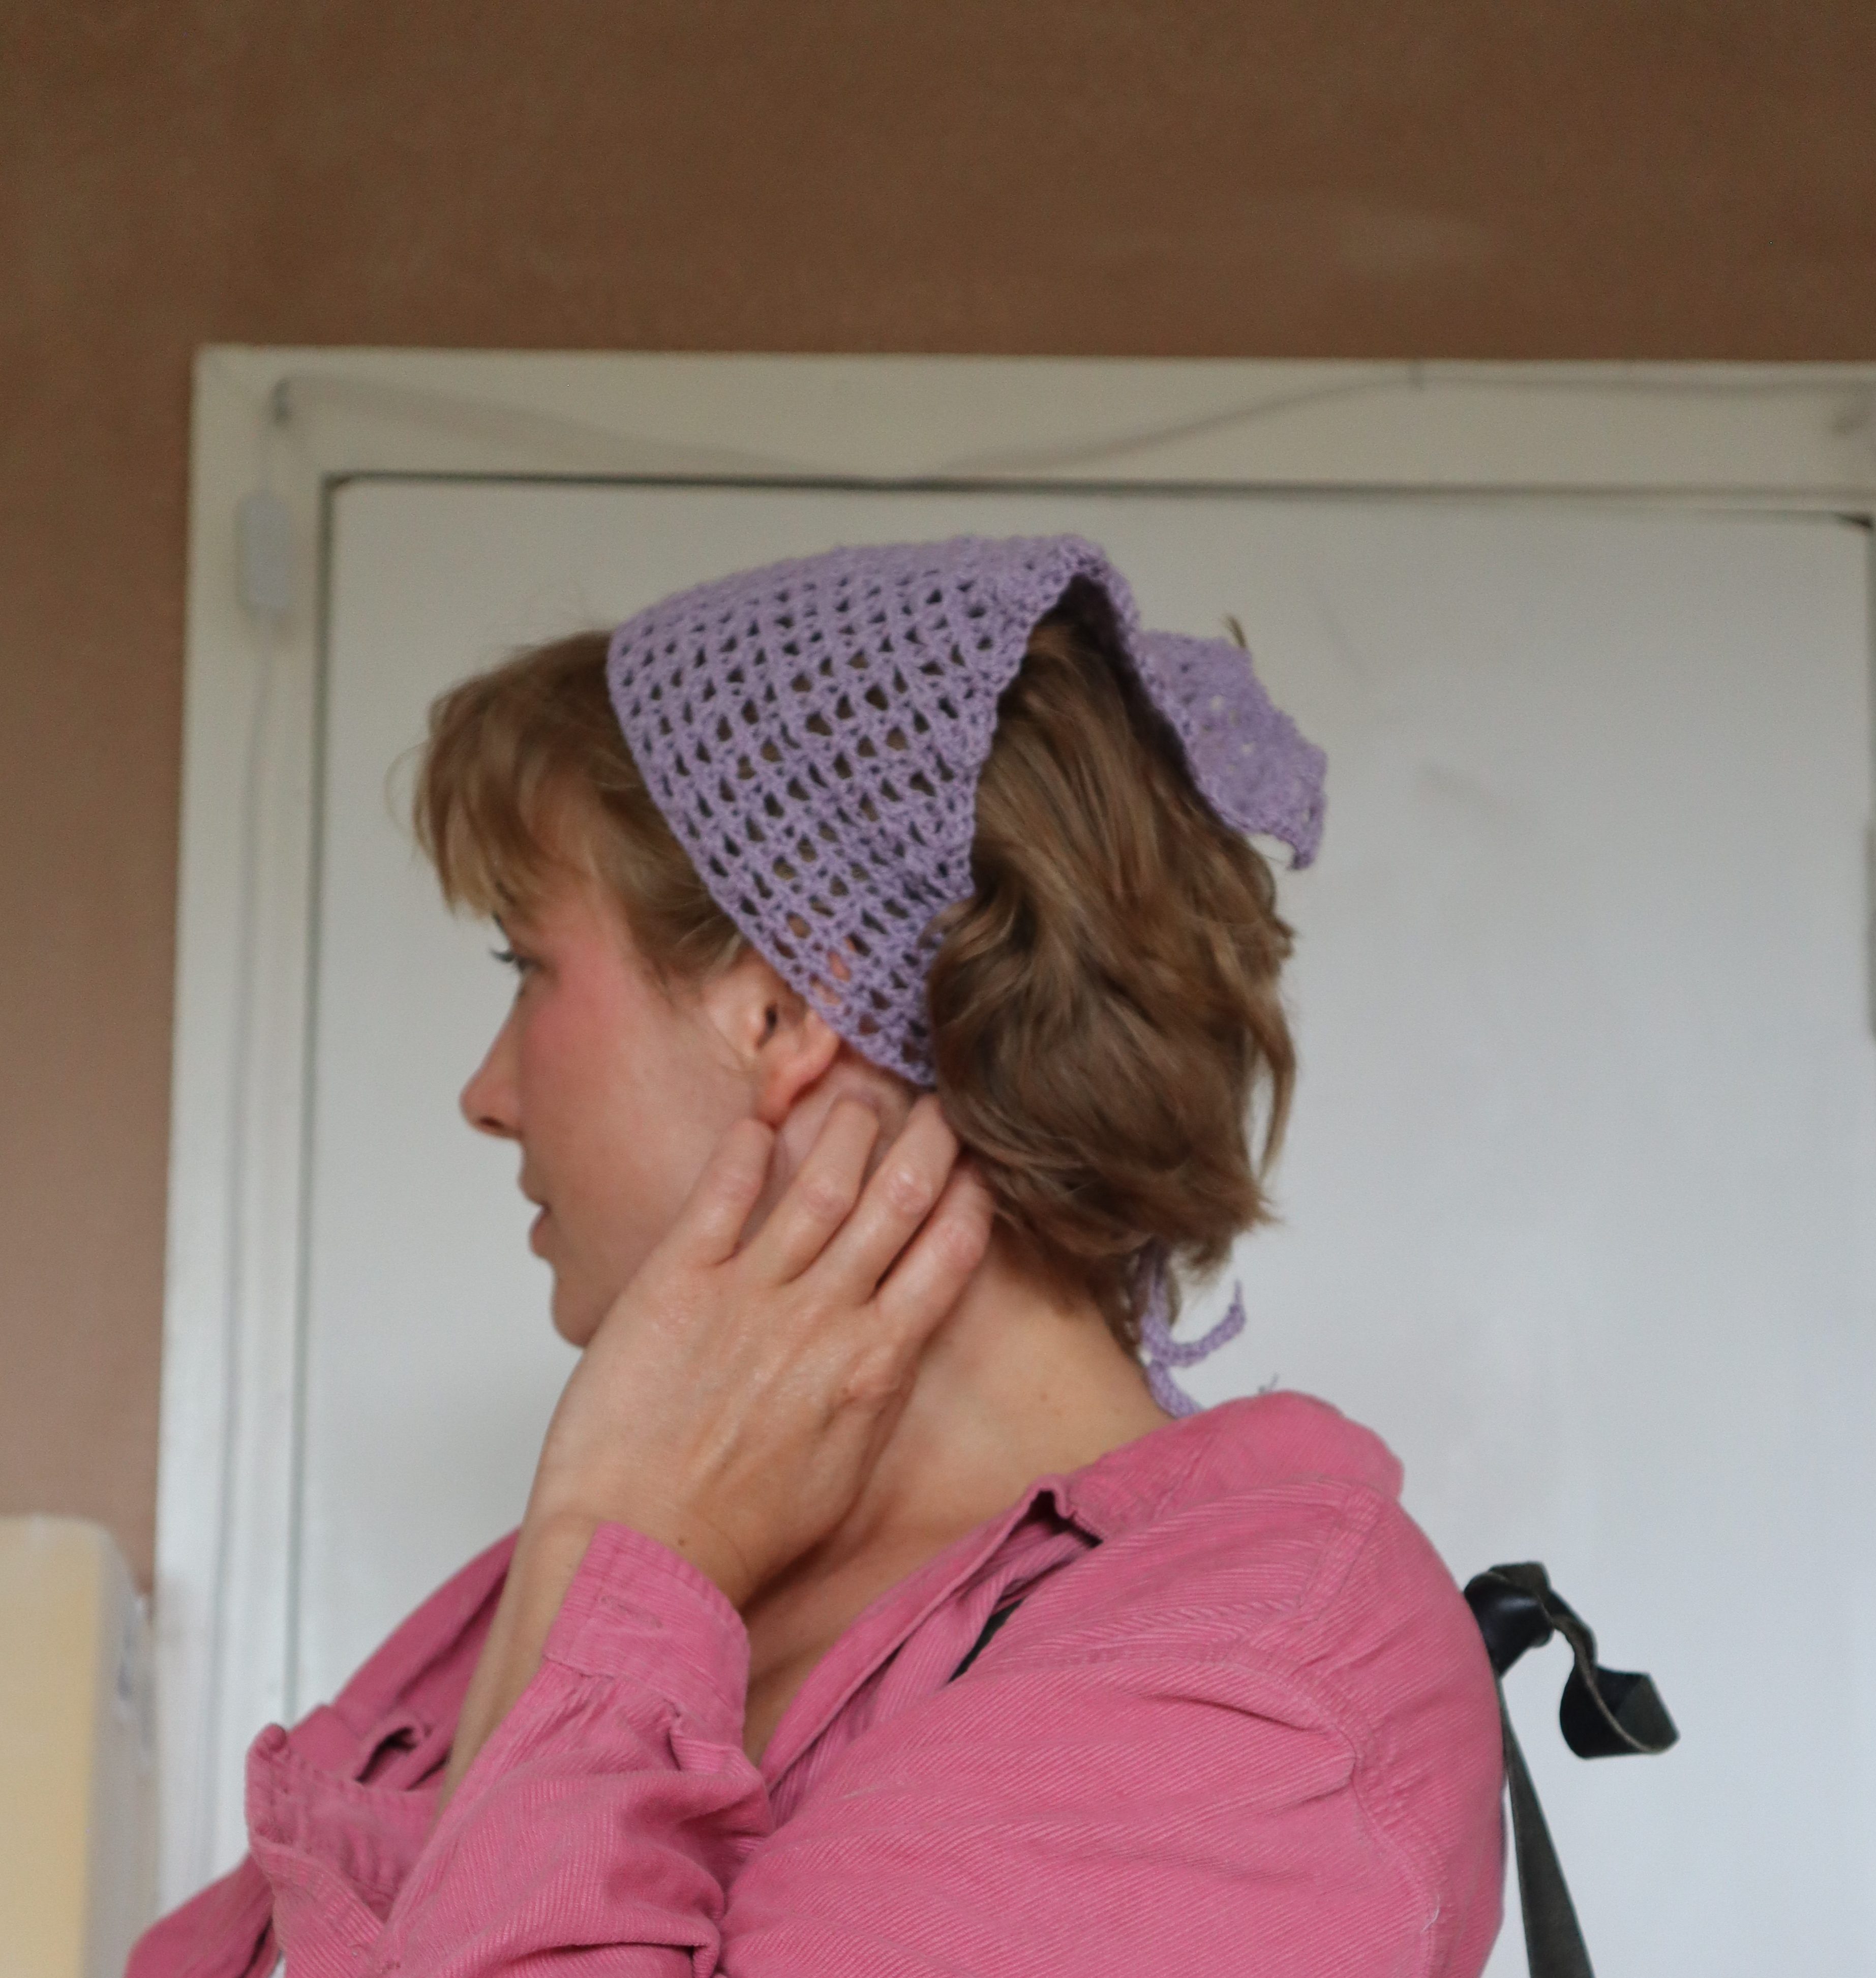
Here is a free simple pattern on how to crochet an easy bandana with triangle shape and a crochet mesh stitch that I invented.
It’s a good idea to measure on your head as you go – stop the increases and continue with no increase rows, when you have the width you want. Mine suits about a 56 cm head cirumference.
If you are able to, you can donate small or big amounts to say thanks for the pattern, this way I can continue to share free patterns:
Hook: 3 mm Yarn: Sport/fine, 50 g = 140 m. I used wool for a stiffer look, but you can use any yarn. 19 grams. Stitch: Ternion stitch – but instead of making the stitches in the chain (between the dc) you make them into the sc. See tutorial here: https://www.youtube.com/watch?v=vDmk8zYBvU4 1 ternion stitch is made the following way: *1 dc, 1 sc into the side-loop of the dc, ch 1* When it’s the last stitch in the row you finish with 2 ch instead of 1 (counting as the 2 turning chains). Increase: By making 2 stitches in the first and last stitch on every 2nd and 3rd row all the way through. After every row: Ch 2. Doesn’t count as a stitch, first stitch is made in the last sc of the row before.
Row 1: Ch 2, make 2 ternion stitches into the 2nd ch from the hook, ch 2 at the end, turn. Row 2: 1 ternion stitch in the first sc, 1 ternion stitch in the last sc, ch 2, turn.
Row 3: 2 ternion st in the first sc, 2 ternion st in the last sc, ch 2, turn (4 st on the row) Row 4: 2 ternion st in the first sc, 1 ternion st in the next 2 sc, 2 ternion st in the last sc, ch 2, turn (6 st on the row)
Row 3: 1 ternion st each of the sc on the row, ch 2, turn (6 st on the row)
Now repeat this pattern: 2 rows of increase where you inc with 1 extra st in the first and last sc stitch, followed by 1 row with no increase, until you have 29 rows. Now you make the one strap – don’t break off.
Get pattern for ribbed asymmetric crochet dress here.
Hook into the side of your row, yarn over, pull through. Yarn over, pull through 1 loop, yarn over pull through both loops. Hook into side of the stitch and repeat (sc chainless foundation).
Insert hook where you started the strap and make a sc-edge (approx 1 sc per row) down to the bottom point of the scarf – make 3 sc in the point (your first row) continue sc and when you reach the opposite side make the same strap. Break off and weave in ends. Pull the edges to straighten the scarf.
Hæklenål: 3 mm Garn: Bomuld, 8/4, 50 g = 160 m Masker: Luftmasker (lm), kædemasker (km)
Du kan prøve den på henad vejen. Sørg for at strække den og stop, når du har den længde, der passer til din hals. Jeg lavede 53 rækker. Du kan også bruge den som et hæklet hårbånd:
Vil du have en bredere version laver du 21 lm til at starte med.
12 lm, lav 1 km i 6. lm fra hæklenålen, 3 lm, 1 km i 3. lm, 3 lm, 1 km sidste lm. 3 lm og vend.
1 km omkring den første bue, 3 lm, 1 km om næste bue, 3 lm, 1 km om den sidste bue, 3 lm og vend. Gentag trin 2. Bryd ikke garnet af. Slut med 1 km omkring sidste bue.
Hækl 1 lm, 1 km omkring 1. bue, 1 km omkring midterbuen, hækl 80 lm. Bryd af.
Lav den samme snor i den anden ende: 1 km omkring den miderste bue, hækl 80 lm. Sy garnenderne ind. Så er du færdig!
I started by making a regular bow using the same stitches as the top. I just crocheted back and forth in rows until I had a long piece and then I used a video tutorial from youtube and folded a bow. But I didn’t like the look, I wanted it to be a little bit more neat so I use another technique which I will show you here.
Use my crochet pattern for this tube top. Get the pattern here. Make sure to make it a bit longer so the top edge can be folded down! Just 5 cm or so. Sew up and down to make sure the edge is in place, then before finishing, add the elastic inside and sew or tie it with double knots. Make the bow seperately (3 pieces in total) and sew the middle, the big part of the bow (but only the back side of it) and the two ends (but only the middle of them, to leave the ends more free).
If you are able to, you can donate small or big amounts to say thanks for the pattern, this way I can continue to share free patterns:
The inspiration comes from the character Summer Roberts from The OC where she in one episode is wearing a tube shop in gingham with a bow on the middle:
Hook: 3 mm Yarn: Superfine cotton, 50 g =170 m Stitch: single crochet (sc) chain (ch) decrease stitch – turn after ever row (turnin chain, doesn’t count as a stitch)
Chain 2. row 1: 2 sc in 2nd chain from the hook, ch 1 row 2: 2 sc in the 1st stitch, 1 in the next, ch 1 row 3: repeat row 2, making 1 increase on every row until you have 13 stitches on the row / 12 rows row 13: make 1 sc in every stitch, ch 1
now you decrease on every row by crocheting together the first 2 stitches. repeat until you have 2 stitches on the row.
now increase again, repeating the first part and finally decrease again. don’t break off.
now place it sideways in front of you, grab the last and first row with each of your hands and fold them so they meet in the middle, forming a bow shape.
now make a chainless foundation (or chains) until you can wrap it around the middle a few times – use the remaining yarn to sew up and down and make sure it is secured. now put it aside and make the ends.
Chain 10 row 1-4: 1 sc in every stitch, ch 1 row 5-: 1 dec in the beginning of the row, by crocheting the first 2 stitches together repeat until you have 2 stitches left, break off but leave a yarn end to sew onto the bow.
Make one more like it. Now sew them onto the bow, onto the back/middle center of the bow. Now you have your finished bow and you can sew it onto the top by sewing through the middle, the big part (only back) of the bow and the ends (but only the middle, so you leave the ends more loose).