For this pattern you’ll need to calculate yourself approx. how much yarn you typically use for a top. I used 162 g for my S/M top. If you make yours in a bigger/smaller size or longer/shorter, you’ll need to add/remove from those 4 balls. The pattern uses your own measurements – try on as you go for best results. Buy access once to get the pattern. It’s a simple pattern and you try it on as you go.
size 1/superfine/fingering cotton yarn (50 g = 170 m). For size L/XL you’ll need 4 yarn balls (200 g). Add/remove approx 25 g per size going up/down.
elastic band (2,5-3 cm wide)
needle to weave in the ends & a sewing needle and sewing thread
Crochet tension: 10×10 cm = 10 rows x 20 stitches
Process:
The shorts are made in 2 panels that are put together at the end. You crochet from top to bottom in horizontal rows with increase to add more width to the bottom of the shorts. In the end you add elastic band.
Always increase and decrease in the middle of the leaf (or as central as you are able to)
Process:
You crochet in rounds in the same direction the entire time from inside and out. Everytime you make leaves you change to green and everytime you make chains you change to beige. The circle (beginning) is beige too.
You always make chains (a chained arch) before and after every leaf and always make 1 slip stitch around every arch (expect for when you decrease on the leaf at the very end).
How to change yarn color:
You always change yarn color in the last stitch of the round before the new color. So if you are making chains in beige you do yarn over in green when making the last chain. When you change to beige you do yarn over in beige on the last green stitch by bringing the yarn through the last time you pull the yarn through.
From beige to green: On your last chain: yarn over in green, pull through. Leave the beige on the back, crochet around it.
From green to beige. When you are at the last stitch (the last time you pull the yarn through) you do yarn over in beige and pull through. Leave the green yarn on the back, crochet around it.
Let’s begin!
Start by using beige yarn.
Round 1: Ch 4, connect to ring with 1 ss in the 4th ch from the hook, ch 1 (turning chain). Make 8 sc into the ring. Continue in the same direction.
Round: 2: 2 sc in every st (16 sc in the round)
Round 3: 1 sc in the first st, 2 in the next – repeat (24 sc)
Round 4: 1 sc in the first two stitches, 2 in the 3rd – repeat (32 sc)
Round 5: Make 1 inc next to the last inc in the round before (so that you don’t make the inc directly on top of each other, otherwise the circle won’t be round). (40 sc)
Round 6: Repeat round 5. (48 sc)
Now the chained arched begin.
Round 7: Make 1 ss into the first sc. *Chain 4, 1 ss in the 3rd sc* repeat =16 arches. Chain 4.
Now the leaf begins. On every round you finish by making a chained arch (and switching to green on the last chain) so that every beginning of your round starts at the first leaf.
Round 8: *1 ss around the next arch. Ch 4 (and change to green on the 4th ch) 2 dc around the next arch, and change to beige on the last dc. Ch 4* Repeat from *to * = 2 arches between each leaf, 2 dc on the leaf = 8 leaves in total. Finish with 4 ch, 1 ss in the first arch of the round.
At the end of each round with increase you gain an extra arch. You still make chains and slip stitches around every arch (and before and after every leaf) and increase on the leaf with 1 extra dc in the last stitch.
Round 9: Ch 3, 1 ss around the next arch, ch 3, 1 ss around the next arch (change to green) 1 dc in the first dc, 2 dc in the 2nd dc, 3 chains, 1 ss = 3 arches between each leaf
Round 10: 1 extra dc in the leaf (in the middle), 3 chains, 1 ss = 4 arches
Round 11: 1 extra dc in the leaf (in the middle), 2 chains , 1 ss = 5 arches – finish the round by skipping the last arch before the first leaf on the round.
On round 12 you skip the last arch between every leaf from the round before = 5 arches.
Round 12: 1 extra dc in the leaf, 2 chains, 1 ss. Now you have 6 dc in the leaf.
On round 13 you start to decrease to make the leaf smaller. You also switch up the amount of chains.
Round 13: 3 chains, 1 ss around every arch = 3 arches. 1 dc dec in the middle of the leaf: by crocheting two stitches together into 1 with a double crochet decrease stitch (dec)
Round 14: Same as the round before.
Round 15: 1 dc dec in the middle of the leaf, ch 6, 1 ss around every other arch = 4 arches.
Round 16: 1 dc dec in the middle of the leaf, 4 ch, 1 ss around every arch.
Round 17: Decrease the last two 2 into 1 dc, 4 ch, 1 ss around every arch
Now the leaf is done, but you continue making chained arches and also make a tiny green thingy between the leaves.
Round 18: 1 ss around the next arch, ch 4, 1 ss around the next arch, ch 4, 1 ss. When you are about half-way between the two leaves (afer making 3 arches) and made a slip stitch, you change to green and make 2 dc in the next slip stitch, ch 4, 1 ss around the next arch, ch 4, 1 ss around the next arch. This way you have an arch after each 2 dc, but not an arch before.
Round 19: 1 ss around the next arch, ch 4. When you reach the 2 green dc, make 1 dc dec on the two dc stitches – turning them into 1. Ch 4, 1 ss, etc.
Round 20: Make one (or more) rounds just making 4 chains and 1 ss around each arch.
Weave in the ends and make one more like it (or many more if you like). It might be a good idea to block it at the end to make sure it’s flat and smooth.
Thank you for trying this pattern, I hope you liked it. If you make and share if on social media be sure to tag @mati_denmark. This pattern is for private use and may not be sold or distributed.
Subscribe to get access
Read more of this content when you subscribe today.
Follow pattern for Selma dress but use 2 strands of superfine/fingering cotton and a 4,5-5 mm hook. Tension: 10 cm = 9 rows x 21 stitches
Get the rose pattern here, free headband pattern here and free pattern for handbag here (this is just made with cotton and a wide strap (same width as the sides and bottom AND blocked with glue and water after).
The shell stitch edge
First you make sure the dress is closed in both sides (no slits). Then you use 2 strand still but a 6 mm hook and treble stitch (yarn over twice).
Insert the hook in the side of the dress, chain 2 or 3). Make 5 tr around the first row, make 1 sc around the 2nd or 3rd row. How to know where to sc? Put the shell down onto the row and make sure it’s not too stretches or too loose, then make a sc whereever. 5 tr around the next row, 1 sc around the 2nd row or so. Pay attention to the fact that you can crochet around a row (dc stitch) or in the hole between two rows – you do you – you can’t do it wrong. If the edge seems too tight, unravel that bit and make your sc closer to the shell and vice versa.
Then when you reach the beginning just make sure you have distributed your stitches so you don’t end up with two shells directly next to each other.
Now do the same thing for the top of the dress – distribute the shells – it’s OK if it’s not perfect – I for instance have 2 shells on one side of my v-neck but 3 shells on the other side (so I have 5 shells in the neckline spread out) – and it’s OK – it still looks good. To avoid extra length on the strap I just made sure that I made the single crochet on the points of the top of the dress (where the straps would be sewn on). But you can also make the shell on the points if you like.
The straps
Before adding straps make chains and a shell stitch edge (I made 6 shell stitch).
Use a 6 mm hook and two strand of superfine/fingering cotton.
You start with a long yarn end (to sew on the strap in the end). And then you chain.
Follow mine or add more/less chains depending on your size (try it on).
Chain 28, make 5 tr in the 4th ch from the hook, 1 sc in the 5th ch from the hook, 5 tr in the next ch, 1 sc in the 5th ch etc. Finish with 5 tr in the last stitch. Add 6 chains for each shell (or remove 6 chains if you need less). My strap measures: 40 cm (incl stretch). So 1 shell measures approc. 6,6 cm.
When you reach the end crochet on the bottom side of the row: 5 tr in the shell from the row before, 1 sc in the sc. Finish with 1 ss in the first tr in the round. Try on the strap with a safety pin or something to see it the length fits you, otherwise add more shells/chains. Break off but leave a yarn end to sew it on. Make one more like it.
Sew or crochet the strap on over 4 stitches or so.
The free pattern for the hairband can be found here. You can find more crochet accessory patterns here
What you will need:
a mini pocket mirror
3 mm crochet hook
size 1/superfine cotton 50 g = 170 m
approx 20 beads and a bead needle
cardboard and some super glue
Let’s get into it!
Start by cutting a piece of cardboard to the size of the mirror + a few mm for an extra edge (so you won’t cut yourself on the edge of the mirror)
Glue it to the back of the mirror
Make 4 chains, slip stitch into the 4th ch from the hook, ch 1
Make 8 sc into the hole
Continue in the same direction and make 2 sc in every stitch (use your yarn end as a guide to where your round stops/starts)
Next round: 1 sc in the first, 2 in the next
Next round: make 8 increase spread out randomly
Continue until you have 6 rounds or until (when you stretch the circle) it fits onto the back of the mirror
Now start by decreasing: make 8 decreases on the round – randomly (by crochetiing 2 stitches together into one)
Do the same on the next round.
Now break of the yarn but leave a long yarn end – weave beads onto the yarn and turn over your work and insert the mirror into the circle
Crochet again 8 decreases on this last round, but also add 1-2 beads on every stitch by bringing the bead up to your hook just before you bring the yarn over on the last time of the stitch. Finish with 1 11 in the first stitch in the round and weve the yarn into the mirror and just hide in inside the back – do the same with the first yarn end you have
And now you can finish off by adjusting the crochet to the mirror – stretch and pull as needed or push the crochet a bit away from the mirror and then put glue on 4 places under the crochet and on the mirror – along the edge, and glue it in place. This way you can adjust if you want the crochet to cover more/less of the mirror.
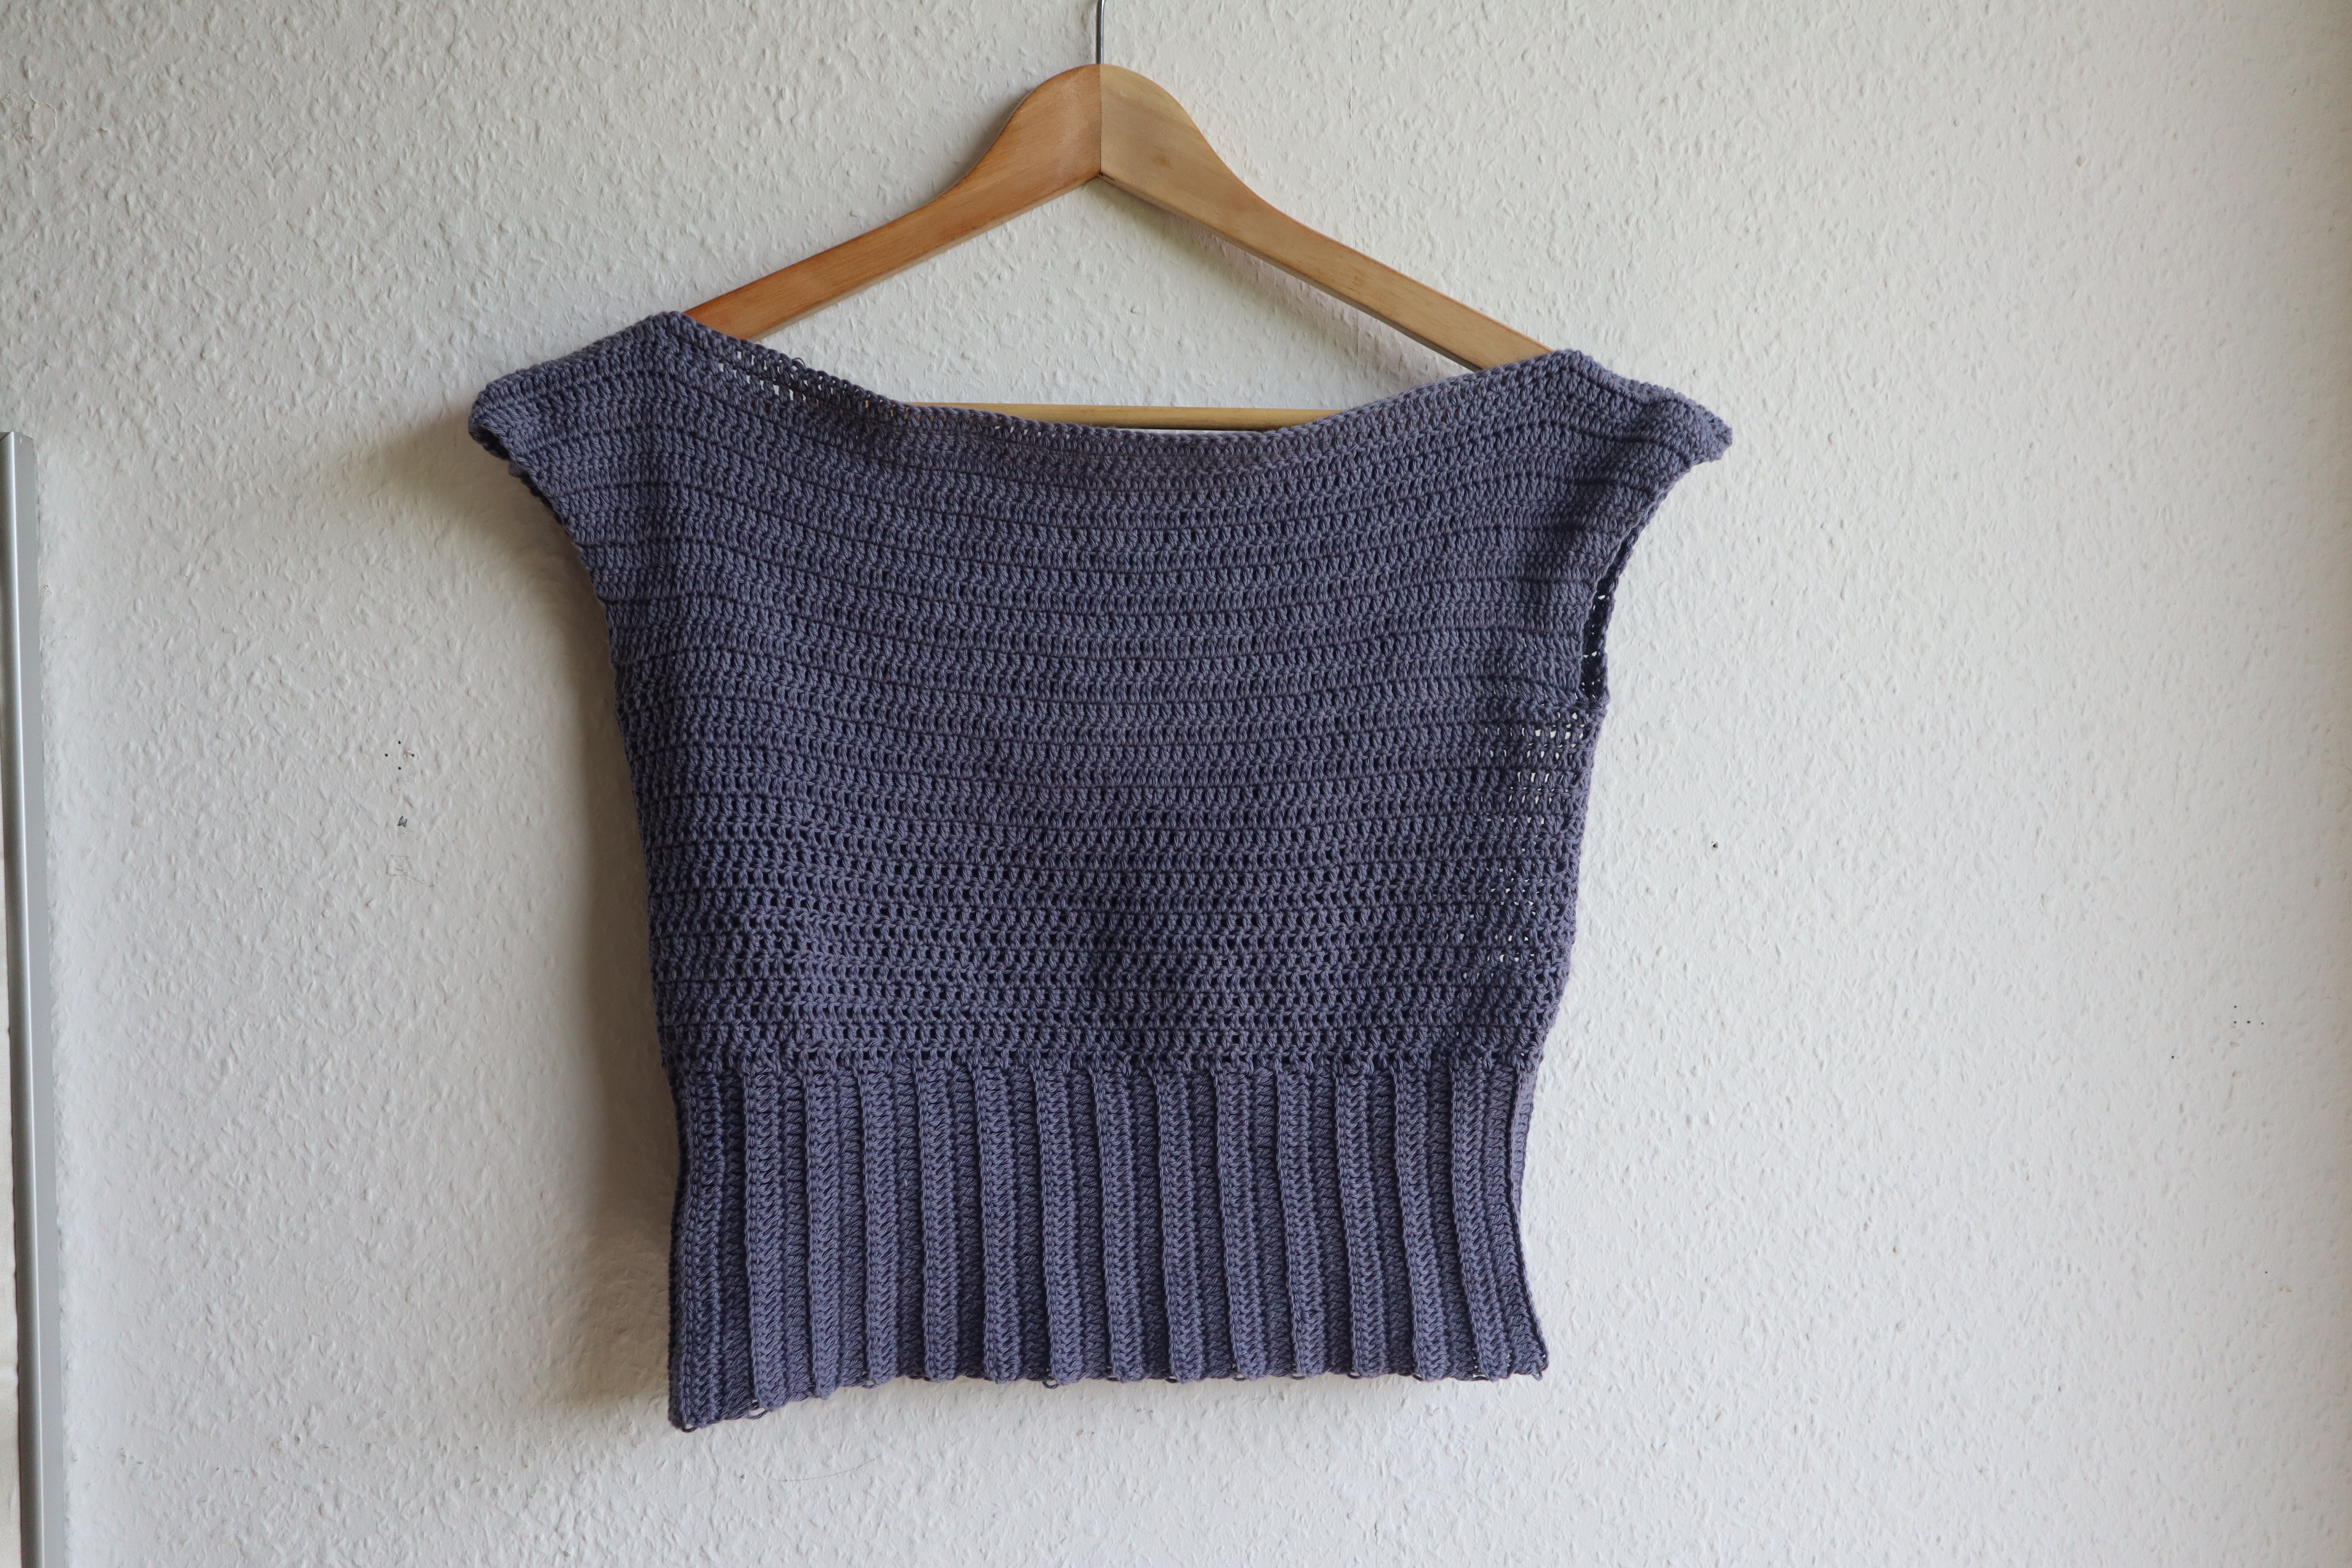
Here you will learn how to crochet this cute chunky and cropped cardigan with ribbed edges, v-neck and textured sleeves. The pattern is thoroughly explained and is good for beginners as everything is made in one, making it great as an intuitive pattern that you can try on as you go. You get a drawing as an overview of the process and each step and you also get a video tutorial of how to make the rib edges.
This is a pattern for a chunky cropped cardigan made all in one (no separate panels that need to be put together).
I used 12 yarn balls at 50 g = 90 m (aran/worsted). 100% wool and a 10 mm hook. So if you are a L/XL maybe try using 13-14 yarn balls, or if you are XS/S use 10-11 yarn balls.
My tension: 10 cm = 7 rows x 8 stitches
You also get my and my cardigans measurements – so you can follow along with my sticth and row count.
Here is a collection of simple, feminine, romantic and timeless crochet outfits to try out this spring/summer – get inspired by the many different looks and buy a pattern to create your own version in your favourite colors! In order to get to the pattern, click the image below.
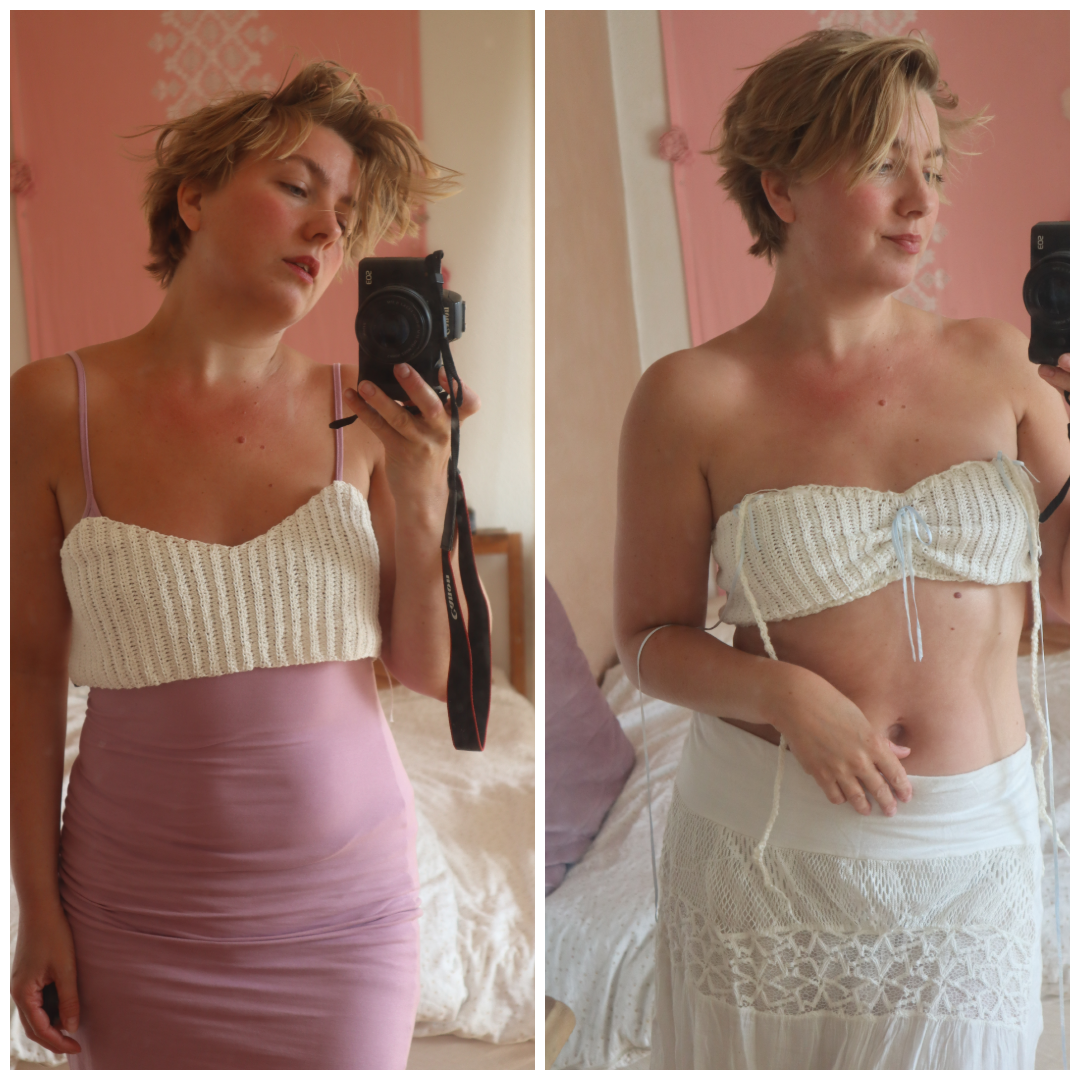
You will need to follow Zoey top in order to make this version, but you don’t need to subtract from your measurements. We need the extra fabric. I used the same yarn and hook as the pattern, but I also used some baby blue ribbon yarn and some white bouclé yarn for the edge – simply because I only had secondhand yarn. The bouclé added another shade of white and also a different texture, I liked that. For the top I even used two different shades of white – it’s okay – an imperfect top is just as beautiful.
The following is the process I made the top.
Now to make the ruffles & add the elastic:
Take 2 pieces of children’s elastic (0,5 cm wide), wrap it around your under bust and over bust, tie a knot – you want it to fit tightly, but comfortably – you can always tie another knot later on if needed (after the elastic is added).
Crochet a hdc edge around the top (top and bottom) by making approc 2 hdc per row (1 per row + 1 between each row) while crocheting around the elastic – see my video tutorials for reference.
The bows:
Find some ribbon yarn (or literal ribbon) then make two bows and sew them onto the front (the points of the top) Take 4 long strands – the longer the better – and sew them each to the inside of the top – on the front and back.
The straps:
Crochet a long straps using sc chainless foundation from each of the points of the top (in front of the ribbon/behind the bow) until you have enough length to tie the strap on the shoulder.
The front scrunch:
Take a long piece of ribbon and weave it through the front of the top – through two rows – parallel to each other (from the bottom and up) and tie them to a bow on the front of the top so you can scrunch the top together.
And you’re done!
(Bonus: embrace the imperfection of loose ends, and leave the ends of yarn from where you crocheted the straps).
If you like romantic crochet clothes, you might also like these patterns:
I wanted to make a crochet version of one my favourite bags which is a 70s style straw bag with a leather strap. You could also make this version with a leather strap or even just make the strap longer so you can wear it on your shoulder. If you know how to sew I would recommend adding a zipper in or even just use a magnet inside it, so you can close it up. Another trick is to sew the top of a bucket bag inside the opening so you can close it with a drawstring inside the bag, and therefore the fabric and drawstring won’t be visible from the outside. But you can also leave it as it is and use it as a handbag, beach bag or grocery bag. This bag reminds me a lot of a Jeanne Damas (Rouje founder) bag, I could totally see her with this bag. I like that it’s simple and casual, and you can use it with a causal outfit too but it also works with a more dressed up look, cause then it will just tone down the outfit a bit.
What you will need:
4,5 mm hook (but please test with your yarn, cause we want a sturdy and compact texture, and still for the crocheting to be comfortable and not strain our hands and wrists (so a comfortable, yet tight tension is prefered)
275 g/275 m super bulky wool yarn (in one or more colors) – i used greige/beige and light brown
a needle for the loose ends
chain, slip stitch, single crochet and half double crochet
How to crochet the bag:
The bag is increased intuitively, so make sure to just spread out the increases (making 2 stitches in one stitch) and don’t make an increase directly on top of the last increase on the round before (this is only ok in the beginning, cause later it will prevent the bag from being round). Crochet in the same direction – no end or beginning (but you can mark your beginning of the row so you know where and when to increase) and you crochet from the bottom and up.
chain 4, ss in the 4th ch from the hook, ch 1
make 8 sc in the ring – continue in the same direction
2 sc in every stitch = 16 stitches
increase with 8 for the next 5 rounds
for the next 7 rows remove 1 increase per round: so 7, 6, 5, 4, 3, 2, 1, increases per row.
now make i sc in every stitch for the rest of the bag (37 rounds in total)
during these no-increase rounds, you may want to make stripes
My stripe patterns goes as follows: 17 beige, 2 brown, 6 beige, 3 brown, 7 beige, 2 brown – but you can mix it up and make your own random combination
finish the round with 1 ss in the next stitch, brerak off and weave in the yarn end.
How I change yarn color: at the end of your round (where you marked your round), while making the last sc in the round, before pulling the yarn through the last time, grab the color you want to change to and pull it through – leaving the main color on the back of the round. When I return to the beginning I switch by doing the exact same thing, before pulling through the yarn on my last sc in the round I pull in the main color. Here I break off the brown because I have a bigger space between the brown colors, but if you change color often, you can just leave it on the inside of the bag and bring them up to you, when you switch color.
How to crochet the strap:
Make 5 chains (in brown) make 1 hdc un the 2nd ch from the hook, 1 hdc in the next three chains, chain 1 and turn. Crochet 1 hdc in every stitch for approx 36 rows, break off but leave a yarn end. Make one more strap, sew them on approx 7 stitches frrom the edge of the bag with approx 20 stitches between each strap and approx 2-3 rows of the strap attached onto the front of the bag. Sew up and down through the edge of the strap (you can imagine that you sew the strap edge like a square – top, bottom and the two sides. Do the same with the other strap on the opposite side and weave in all the ends.
If you want to make sure it holds its shape you can block it using universal glue and water and leave it to dry overnight. You can also try and make it even bigger and then felt it by washing it on high and drying it flat.
Ever since I noticed how well boat necks fit me, I have been paying attention to boat neck tops in tv and film, and when I was rewatching Legally Blonde for the 20th time the other day, I fell in love with a striped blue-greenish top that Elle Woods is wearing while studying for the LSATS. She sits on the floor reading a book and wears jeans and a belt and has loose hair. sYou can check out the scene here.
What I love so much about this top is that you can’t really crochet anything wrong per say – just follow the pattern for Helena top, make the foundation in dc and then start switching between hdc and dc. When you get to the next row either make hdc into hdc (look at the row below you whether it’s a small or big stitch), dc into dc OR do the opposite and make hdc into dc and dc into hdc. One will make the row look kinda crooked and the other make it look wavy – I did a bit of both and even just switched it up on one row – this means that you don’t have to think much, you can just kinda crohet whatever – make 10 hdc after each other then make 1 dc, 1 hdc, 1 hdc, 1 dc – like just do it completely random if you want.
How to always make stripes look good
The same goes for the stripes, yarn weights and colors – I chose beige, two shades of green, silver (that looks blue when paired with these colors!) and some sparkly yarn that I only crocheted in hdc (simply because I didn’t have a lot of it and wanted to save some). You can go for fine/sport like I did but with the hook size you can also use worsted or even bulky yarn – it’ll work great as well and give even more unique texture and enhance the wavy look even more. Especially if you use some sparkly bouclé yarn as I did, it makes if look really unique.
Again, you can just mix the stripes at random and even just leave the yarn end at the beginning of the row and pick it up later, as you work in the round. I like to generally always add a neutral color between each color change, but sometimes I have switched it up and made two shades of green after each other – this works best with similar colors, if I was using contrast colors I would have definitely seperated them with a beige or silver color.
Have fun with it!
Play around and have fun, this is the most unique top made from such a simple pattern. The pattern comes in three sizes but you can easily size it up, by just adding more stitches and rows – and try it on as you go. I made it in size S, the sizes are made to be on the bigger side, or at least make the top fit more loosely, which I like with this one, because the stitches are see-through.
You can wear a top under, or even just sew a piece of fabric on the inside to cover the breast area if you want (or wear a neutral colored bra).
I think this top will look so good with jeans but also a midi skirt.