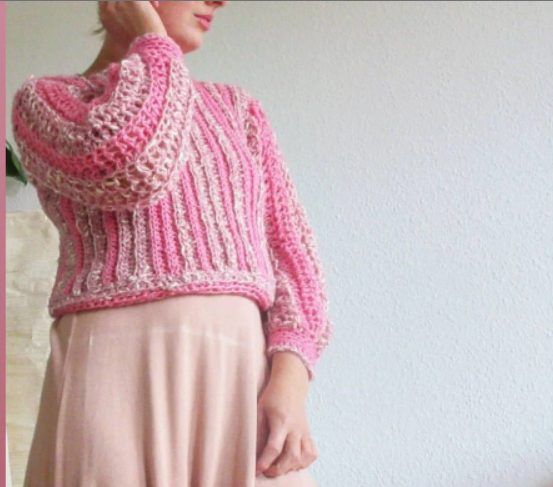
I started by making a regular bow using the same stitches as the top. I just crocheted back and forth in rows until I had a long piece and then I used a video tutorial from youtube and folded a bow. But I didn’t like the look, I wanted it to be a little bit more neat so I use another technique which I will show you here.
Use my crochet pattern for this tube top. Get the pattern here. Make sure to make it a bit longer so the top edge can be folded down! Just 5 cm or so. Sew up and down to make sure the edge is in place, then before finishing, add the elastic inside and sew or tie it with double knots. Make the bow seperately (3 pieces in total) and sew the middle, the big part of the bow (but only the back side of it) and the two ends (but only the middle of them, to leave the ends more free).
If you are able to, you can donate small or big amounts to say thanks for the pattern, this way I can continue to share free patterns:
The inspiration comes from the character Summer Roberts from The OC where she in one episode is wearing a tube shop in gingham with a bow on the middle:
Hook: 3 mm Yarn: Superfine cotton, 50 g =170 m Stitch: single crochet (sc) chain (ch) decrease stitch – turn after ever row (turnin chain, doesn’t count as a stitch)
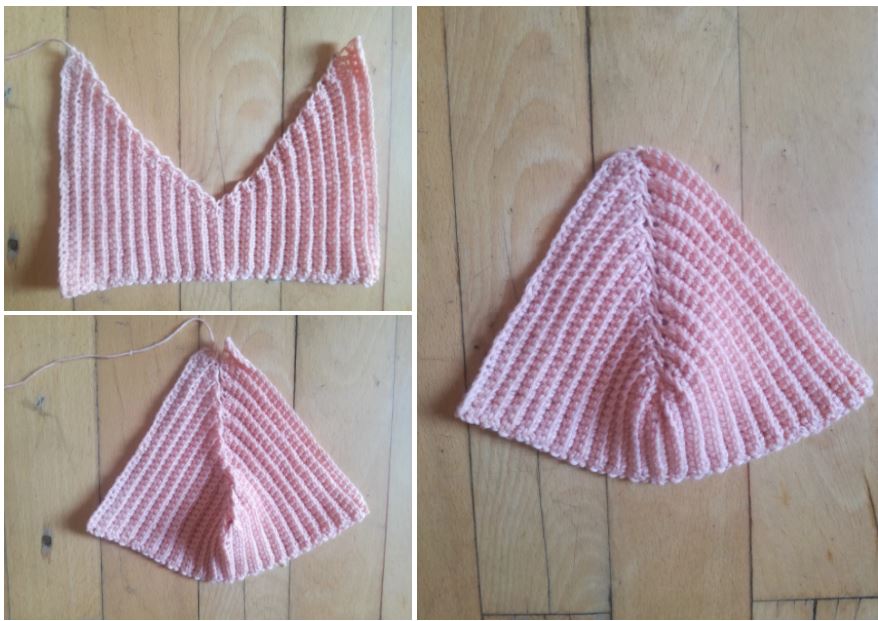
Chain 2. row 1: 2 sc in 2nd chain from the hook, ch 1 row 2: 2 sc in the 1st stitch, 1 in the next, ch 1 row 3: repeat row 2, making 1 increase on every row until you have 13 stitches on the row / 12 rows row 13: make 1 sc in every stitch, ch 1
now you decrease on every row by crocheting together the first 2 stitches. repeat until you have 2 stitches on the row.
now increase again, repeating the first part and finally decrease again. don’t break off.
now place it sideways in front of you, grab the last and first row with each of your hands and fold them so they meet in the middle, forming a bow shape.
now make a chainless foundation (or chains) until you can wrap it around the middle a few times – use the remaining yarn to sew up and down and make sure it is secured. now put it aside and make the ends.
Chain 10 row 1-4: 1 sc in every stitch, ch 1 row 5-: 1 dec in the beginning of the row, by crocheting the first 2 stitches together repeat until you have 2 stitches left, break off but leave a yarn end to sew onto the bow.
Make one more like it. Now sew them onto the bow, onto the back/middle center of the bow. Now you have your finished bow and you can sew it onto the top by sewing through the middle, the big part (only back) of the bow and the ends (but only the middle, so you leave the ends more loose).
Hvis du kan lide hæklede sweatere med store ærmer, så kan du også prøve denne hækleopskrift på en tyk men let trøje med rullekrave og store, brede ærmer. Klik her.
If you know these basic stitches you will be able to make many of my patterns.
Learn crochet stitches
Learn how to crochet CHAINLESS FOUNDATION
If you want to make garments it’s good to know chainless foundation. Chainless foundation acts as the first row or round on your project. In this playlist I show you how to make chainless foundation with three different stitches.
Other good things to learn:
crochet in a circle (for making circle shapes for either garments or animals)
add new yarn to your project (either by tying yarn ends together or pulling the new yarn through the stitch)
decrease and increase (meaning to either remove or add stitches to create a specific shape)
crocheting out from your existing crochet (this is if you want to add something extra to your project)
CROCHET STITCHES
Learn how to crochet unique stitches for your next crochet pattern. you can use these if you are thinking of designing your own crochet pattern. These are some of my personal favourite and there is a lot of stitches that I have invented myself, this will give your crochet project or crochet clothes a unique look.
ROUND MESH STITCH
Learn how to crochet this unique stitch I came up with that consists of circles and looks like tentacles.
123 TEXTURED STITCH
Learn how to crochet this textured stitch that I came up with, which is very meditative.
Learn how to crochet an old viking stitch as a cord:
LOOP STITCH
Learn how to crochet the loop stitch as seen on the Freya jacket. You can also cut and brush it (like I show in the video) and get a faux fur look which is both plastic free and vegan as you will be using cotton yarn.
Here Hariet top is made with 2 colors and lace on the edge, under the bust and on the straps. The bust is made in hdc instead of dc.
Here the lace stitch is used as stripes and as the entire bra cup.
WAVE STITCH
Here’s how to crochet a 70’s crochet stitch with beautiful and unique texture. This is a stitch I learned from a Danish vintage crochet book from the late 70‘s.
In the following video tutorials you can learn how to crochet (or add to your crochet) with a numerous of different techniques and stitches. Let your imagination run wild and find inspiration for an exisiting pattern, let them help you understand how to make clothes and find ways to make your own crochet pattern.
Elastic thread is super fun to work with. I use it in my crochet rows to add this ruched effect – the same way you would add it to a sewed item, but here you just manually insert it and crochet around it. I also sometimes just use it in one area of the row to make one area more tight.
Have you ever tried adding elastic bands to your crochet? You can add it to the edge, all around or just one area where you want to tighten the crochet or make it stretchy. You can even add it into your crochet straps, see below.
With this crochet dress pattern you learn how to crochet a romantic dress with elastic thread in the waist and thin elastic band in the edge of the top for a comfortable and ruched effect.
Another use of this elastic is to create ruffles in both edge and straps. Kind of like how a scrunchie works. This both creates a ruched effect on the bra cups as well as making the dress more comfortable.
Here’s an example of a crochet top with long sleeves and rib, where I only inserted elastic in one area of the sleeve – the top edge – this way it holds the sleeve in place plus makes it a more comfortable crochet blouse top wear.
How to make a beaded pendant for your bag or crochet clothes:
FLOWER EMBROIDERY
Learn how to make simple flowers on your crochet clothes with this embroidery tutorial:
GRANNY RECTANGLE
I didn’t know what to call this because technically it is not a granny square, but a rectangle. I use it for Althea top but you can use it for a number of different things. How about making them in a big version and using it for a jute bag? Try thisfree crochet pattern for a granny rectangle bag.
BEADED CROCHET
Check out this video tutorial and learn how to crochet with beads. With this tutorial I teach you how to add beads to your crochet clothes. I have added beads to my Florence top, but you can add it to any crochet project where you are working in rows or rounds.
CONNECTING PANELS
How to crochet on the side of the row and how to connect crochet panels with your crochet. This is instead of sewing – the good thing about this is that you can easily unravel if needed whereas sewing is harder to undo without wasting yarn.
SPAGHETTI STRAPS
To fulfil the Y2K and 90’s crochet look you will need spaghetti straps. They are simple and elegant and so easy to crochet:
FLOWER EMBROIDERY
If you want to make your crochet clothes even more unique why not add this flower and leaf embroidery? It is actually quite simple. Get the free crochet tutorial here:
BRA CUPS
This is the tutorial I use for many of my designs with bra cups. Learn how to crochet a bra cup in any size:
Here’s how you can sew in you yarn ends once you’re done with your crochet project:
More crochet tips and tricks:
Learn how to crochet beautiful, simple and romantic clothes for women and girls
Here you’ll find all crochet patterns for crochet clothes and crochet accessories. Learn to crochet clothes for girls and women, such as dresses, bags, crochet sweaters, pants, shorts and skirts. Always make sure to measure the first row or round against your body – and stretch it – as the measurements and calculations given are only suggestions. Explore the many timeless crochet designs made for simple people who want beautiful crochet clothes for everyday and party. Whether you are a seasoned crocheter or completely new, there are crochet patterns for you. So look around, get inspired and find your own self-love and confidence while crocheting something beautiful for yourself.
Crochet patterns for crochet tops and vests
Here you will find crochet tops – both a simple crochet strap top, a crochet top with a cowl neckline or a crochet vest. You will find both sleeveless crochet tops, crochet long-sleeved blouses and if you look under crochet sweaters you will also find crochet summer sweaters that can easily be used as a long-sleeved top.
Patterns for crocheted skirts and dresses
In this crochet category you will find, for example, a crochet wrap dress, a crochet bodycon dress, a crochet rock romantic dress or, for example, a crochet tunic for the beach or to wear over jeans. You will also find crochet skirts – both a pattern for a crochet beach skirt with unique crochet stitches, a tight-fitting crochet skirt in a rib pattern (crochet that looks like knitting) as well as a crochet mini skirt with elastic at the waist and a slit in the side.
Patterns for crocheted sweaters, jackets and cardigans
Here are both crocheted sweaters for summer and winter, crocheted striped sweaters (if you want to crochet a sweater in scrap yarn, for example), a crocheted chunky sweater that resembles a chunky knit, and light, crocheted sweaters with a lace pattern.
Crochet accessory patterns
Crochet accessories, for example, crochet for the home such as crochet dishcloths and crochet tea towels, a crochet plant hanger, learn to crochet a jute scrubber for cleaning in the home, a crochet net that can handle a lot of weight or a crochet tote bag or crochet task for the beach or city trip. You will also find a crochet pattern for a crochet hat – both with a wide brim and a crocheted bully hat. Learn to crochet socks in a super simple way and learn to crochet a mini scarf or, for example, a crocheted rose or crocheted earrings that look like leaves and flowers.
Patterns for crocheted shorts and pants
Whether you like crochet that looks like knitwear in the form of a pair of ribbed crochet shorts with an elastic waist, or a more romantic style such as crochet shorts with embroidered flowers, crochet biker shorts or crochet pants with a seashell pattern, there is something for you. With these simple crochet patterns you can learn how to crochet pants and shorts in any style and size.
Hæklenål: 3 mm Garn: Jute, sport, 50 g = 100 m. 150 gram. 1 nøgle i hver farve. Jeg brugte lilla, koral og cremefarve. Købt i Søstrene Grene. Du bruger 2 garntråde, derfor start med at lave hver nøgle til 2 nøgler.
Med denne hækleopskrift kan du lære at hækle en fast hæklet taske med plads til en lille pung, læbepomade og din smartphone.
Køb opskriften til hæklet nederdel her, eller hæklet bikini top her.
Striberne er lavet tilfældigt
Denne version af Selene toppen er lavet ved at udelukke rygstykket og starte ved under brystet i stedet for taljen (fjern de første rækker – dem der er en del af ryggen.Fold de første par rækker og sy fast. Lav en snor med fm i lufmaskefri start indtil den kan bindes omkring din krop og træk igennem rækken på begge skåle.
rk 1: 5 lm, 1 m i 2nd m fra nålen 1 fm i de næste 3 lm vend med 1 lm.
rk 2: 1 fm i hver maske (lm tæller ikke som en maske) = 4 fm
Gentag rk 2 indtil du har 80 rækker. Bryd garnet af.
Fold det sådan her:
Så du har 40 rækker på den lange side og 20 og 20 på venstre og højre side. Marker begge hjørner. Jeg hæklede fm i alle 4 masker.
Nu til bagsiden + låget af tasken:
Jeg startede med lilla. Hækl 40 lm + 1
Række 1: 1 fm i hver maske, vend med 1 lm = 40 fm.
Række 2: Gentag rk 1
Række 3: 1 indtagningen ved at sammenhækle de første to masker til 1, så 1 fm i hver maske, vend med 1 lm.
Gentag rk 1, 2 og 3 så du har 20 rk. Dvs 1 indt. i starten af hver 3. rk.
Nu starter udtagningen. Udtag med 1 maske på hver 3. rk ved at hækle 2 fm i første maske.
Efter 14 rk udt., 34 i alt bryder du garnet af.
Det forreste af tasken (stykket som låget bliver klappet ned på)
Gentag hvad du gjorde ved bagsiden, men stop efter 20 rk. Bryd kun ét af. garnet af eller skift farve og bryd begge af.
Kant – nu skal tasken samles! Ved kanten bruges kun 1 stykke garn.
Creme farve. Læg siden (som du hæklede først) og hækl fm i hver række på tasken indtil du når hjørnet du markerede i starten.
Lav 1 extra maske i hjørnet og fortsæt med 1 fm gennem hver maske/række i bunden af tasken, ved næste hjørne hækler du igen 1 exra maske, når du når toppen af tasken, hækler du 1 maske i hver af de 4 fm og gør det samme med den anden side af tasken.
Hækl også fm på “låget” af tasken og over åbningen. 1 fm per række/maske. Slut med 1 km i første fm. Bryd garnet af.
Lav en strop på følgende måde:
Start med kun 1 stykke garn. Indsæt hæklenålen i siden af tasken, ikke kun under fm-kanten men dybere ned så den sidder exra godt fast. Lav 1 km, indsæt hæklenålen i næste maske, slå om, træk igennem (2 løkker på nålen), slå om, træk igennem 1 løkke, slå om, træk igennem begge løkker. Fortsæt som set herunder:
Lufmaskefri start med fm. Gentag indtil du har 33 masker i den farve. Skift farve, gentag indtil du har 30 i den farve. Skift farve og gentag indtil du har 25 i den farve. Slå om, træk igennem begge løkker. Bryd garnet af og sy begge garn ender i, i hver side.
Jeg brugte lilla, hvid og koral til min strop.
Magneter
Brug 2 magneter. Læg dem der hvor du ønsker, luk låget og tjek at den passer. Sy op og ned igennem maskerne og over magneten. Kun lige så den er dækket én gang som set på billedet. Dækkes den for meget virker den ikke.
Med låget skal du kun sy i maskerne på indersiden, ikke hele vejen igennem da det så vil være synligt på forsiden!
Sy de resterende ender ind og blok tasken ved at gøre den våd med vand (evt et bad med flydende almindelig lim, ca. 2 spsk, og vand). Form og læg den fladt på noget plastik eller blot avispapir hvis du nøjes med vand (som jeg gjorde med min). Kom også papir eller en plastikpose ind i tasken, så den bliver formet, og lad den så tørre natten over.
Denne bruger jeg til mange af mine hækledesigns. Følg videoen herunder eller køb hækleopskriften til en af mine mest solgte designs, Mirabel top, here.
Med denne hækleopskrift kan du skabe enhver top du ønsker, tilføj fastmasker, muslingemønster eller lad dig inspirere af nogle af mine designs herunder. Du må gerne sælge de designs du laver, men husk at kreditere og linke til www.matidenmark.com eller @mati_denmark.
Kunne du tænke dig at skrive en hækleopskrift? Enten til eget brug, for at venner og familie kan lave dine designs eller måske til at sælge og tjene penge på? Så læs videre her!
Jeg har designet hæklet tøj mm siden 2015 og lærte senere mig selv, hvordan man laver hækleopskrifter til at sælge. Jeg lavede mange fejl henad vejen og lavede hæklemønstre, som jeg gerne ville have skulle være intuitive, men i stedet endte med at blive mere komplekse. Det er en fin balance mellem at gøre det, der giver mening for dig, og samtidig gøre det nemt for andre at forstå.
Mine egne tanker om at lave dine egne hækleopskrifter er dog, at det først og fremmest er vigtigt, at det giver mening for dig. Intet er mere frustrerende end at prøve at forklare noget, som du ikke selv forstår.
Hvis du er interesseret i at designe hækletøj (eller andre ting) og vil lære at lave din første hækleopskrift, så læs videre.
Hækl tøjet til din opskrift
Først skal du faktisk have en færdig hæklet top, sweater eller andet, som du vil skrive mønsteret ned til. Måske har du allerede lavet det, og det venter bare på, at du skriver trinene ned?
Skriv processen ned (for dig selv)
Så du selv forstår det. Gør det meget enkelt, fra start til slut. Hvad gjorde du, trin for trin?
Når det kommer til at skrive et mønster på den konventionelle måde, skrive rækker, trin osv., så vælg den teknik, der virker for dig. Du kan skrive steps, punkter eller rækkenumre. Hvad end der virker for dig. Bare sørg for at skrive det ned i detaljer, hvad du gjorde.
Ting, der er gode at huske er: hvor startede du? i midten, siden, bunden af projektet? Hæklede du i rækker eller omgange? Hvornår startede udtagningerne? lavede du luftmasker til sidst, tæller disse som en maske eller vendemasker? osv.
Lav overskrifter med store bogstaver for at gøre det mere fordøjeligt
For at gøre det nemmere at læse for dig og andre, lav sektioner for hvert område af hækleprojektet. Skriv en titel og måske en undertitel under, hvor du kort skriver, hvad dette afsnit handler om, eller hvis noget ændrer sig i mønsteret i dette afsnit. Måske skifter du garnfarve, hæklenål eller andet.
Skriv de “indlysende” ting ned
Det er en fejl, jeg har lavet mange gange! Ting, som ikke at skrive hvilken nål jeg brugte, hvor meget garn eller hvilken størrelse garn jeg brugte. Jeg skrev ikke ned, hvor jeg skulle starte, eller hvornår jeg skulle bryde garnet af. Det er faktisk ret afgørende, har jeg opdaget, at skrive de ting ned, der kan virke indlysende – som at starte og slutte på projektet eller afsnittet, så læseren ved, hvor de er, og hvad næste skridt er.
Dette er hvad jeg synes er vigtigt at skrive ned:
Angiv de materialer, du bruger Garn, hæklenål osv. (også mængden – gram og meter)
Angiv de masker, du bruger og er det UK eller US masker hvis du skriver på engelsk? Hvis du bruger muslingemasker kan du skrive: “Sådan hækler du muslingemasker”, efterfulgt af forklaringen eller link til din Youtubevideo, hvis du har det. Skriv forkortelsen for masken, som fx: “fastmaske= fm”
Hvor du starter I bunden af projektet, siden eller toppen? hækles der oppefra og ned, nedefra og op? arbejder du i rækker eller omgange?
Hvordan du afslutter du rækken eller omgangen og starter en ny Fx “1 luftmaske, vend” eller “hækl 2 luftmasker, fortsæt i samme retning”. Lad folk vide, om luftmaskerne bruges som en maske, eller om det bare er en vendemaske.
Skriv: “Bryd garnet af” eller noget lignende Skriv dette når som helst hækleren skal afslutte et område og starte et andet sted, ellers kan det blive forvirrende.
Skriv en oversigt over processen Lav et udsnit før selve hæklingen af mønsteret, hvor du giver et overblik (tekst, billeder, en tegning i Paint eller hvad du kan lide) over hele processen, for at give en idé om, hvad der skal ske.
Hvad produktet måler Læs nedenfor for mere om størrelser. Hvis du kun laver én størrelse, skal du angive, hvad tøjet måler/hvilken størrelse det er, så folk kan afgøre, om det er den rigtige størrelse til dem.
…. Men hold det simpelt
Ja, det er en god idé at skrive alt ned, selv de mindste ting, men også vigig at holde det simpelt og ikke skrive sidevis af tekst.
Hvad med størrelser og mål?
Først og fremmest – alle størrelser (selv de samme størrelser) er forskellige fra mærke til mærke, så det er helt okay at lave dit eget størrelsesskema, eller du kan for eksempel bruge en fra fx H&M’s hjemmeside. Bestem hvad bryst-, talje- og hoftemålet er for hver størrelse. Måske bare start med tre størrelser. At være inkluderende er godt, men det er endnu bedre ikke at skulle føle, at du drukner med 10 forskellige størrelsesmuligheder. Start enkelt, og når du har 1 størrelse kan du nemmere gå op og ned derfra.
Sådan har jeg gjort det:
Skriver mine egne mål ned (der er relevante for mønsteret) Hvis det er en top kan det være: bryst, talje, længde, ærmegab
Tæller hvor mange masker jeg starter med, hvor mange rækker jeg har i alt, hvor mange rækker/masker der er i ærmegabet på min top.
Måler hvor mange masker der svarer til 2 cm.
Måler hvor mange rækker der svarer til 2 cm
Bestemmer hvor mange cm (i omkreds og længde) der er mellem hver størrelse (ca.)
Nu hvor jeg har den information, kan jeg beregne hvor mange masker og hvor mange rækker jeg skal tilføje eller fjerne fra den originale top, så jeg får en top i en større eller mindre størrelse.
Et eksempel på en af mine one size hækleopskrifter, der er blevet solgt adskillige gange og er det mest populære blondetøj i min shop.
One size hæklemønstre er helt OK
Jeg synes også, det er vigtigt at slå fast, at det også er muligt at lave et mønster kun i din størrelse. Når du først starter ud, skal du huske at give dig selv tålmodighed og en lang line – tag det et skridt ad gangen. Forvent ikke, at du ved, hvad du laver, eller er skal være “professionel”. Tillad dig selv at lære hendad vejen. Jeg har flere hækleopskrifter, der kun er 1 størrelse, og de sælger stadig, selv her 5 år efter min første opskrift.
Gerda ponchoen stammer fra Gerda halsvarmeren som jeg tidligere kaldte “ribbed neckwarmer”. Men nu, når jeg, eller andre, hører navnet “Gerda poncho” og “Gerda neckwarmer”, vil de forbinde det navn med denne, og ikke de hundreder eller tusinder af andre hæklede produkter kaldet “ribbed neckwarmer” eller “ribbed poncho”.
Giv dit hæklemønster et navn
En anden fejl, som jeg har lært, er at navngive hæklemønstre og hækledesigns. Ikke alle gør det, ikke engang store hækle- og strikdesignere. Men jeg synes, det er en god idé af flere grunde:
At tage ejerskab af designet. Dette er dit, du navngav det, du ejer det.
Markedsføring. Hvis du vil promovere produktet, vil det let forsvinde blandt alle de andre ting, der kaldes “hæklet top”, men hvis du kalder det noget unikt, er det mere sandsynligt, at folk finder det. Du inviterer også folk til at hashtagge navnet og derfor hjælpe med at sprede det rundt på SoMe
Skal du lave en hækle webshop eller lignende, er det en god måde at skelne dine forskellige varer fra hinanden.
Det er lidt sødt at give den et navn 🙂
Se på andres hækleopskrifter
Se, hvordan andre hækleres opskrifts-layout ser ud, og spørg dig selv, hvad du kan lide eller ikke kan lide ved mønsteret. Du kan endda tjekke nogle af mine gratis opskrifter ud, og se om du kan blive inspireret til, hvordan du konstruerer et mønster.
Hvis du synes, at nogle ting er for svære at forklare på skrift, så brug billeder eller en lille video til at vise den del. Du behøver ikke en hel tutorial, men bare for at visualisere bestemte ting, og gøre det enklere.
Der er ikke én rigtig måde at lave et mønster på
Jeg har prøvet at følge Youtube tutorials, enkle og avancerede mønstre, og ved du, hvad jeg lærte? Der er IKKE én korrekt måde at gå til det på. Nogle laver intuitive mønstre, hvor det er “tag rækken rundt om din talje og lav flere masker, hvis det er nødvendigt”. Andre har “række 1, række 2, række 3”, og det ene er ikke bedre end det andet. Vores hækleopskrifter kan ikke gøre alle glade, og det behøver de ikke. Så det er bedre at gøre det, der virker for dig. Spørg dig selv, hvad jeg plejede at spørge mig selv: “Hvordan ønsker jeg at læse en opskrift? Hvad vil jeg gerne se?” Og tænk på opskriften som selve tøjet – det er okay, at det ikke er alles stil. Nogle vil kunne lide det, og nogle vil hade det, og det kan ikke være på nogen anden måde.
Det samme gælder i fothold til at tilføje billeder af hækleprocessen eller lave en video – gør det, der passer dig bedst! Hvis det virker for dig, fantastisk, hvis ikke, så kan du stadig få succes med dit hæklemønster! Jeg har selv følt, at billeder og video under processen nogle gange har forstyrret nydelsen ved at hækle, mens andre gange kan jeg godt lide at dokumentere undervejs. Det ene er ikke mere rigtigt end det andet.
Hold det intuitivt
Dette er måske ikke noget for dig, men jeg har brug for dette som et afsnit i denne artikel. Intuitivt hæklede designs er min egen favorit, fordi de nemt kan justeres i forhold til størrelse, hvilket garn og nål du bruger, og det gør dig mere fri af at kigge i opskriften (du behøver fx ikke følge med for hver række).
Så jeg håber du vil overveje intuitive opskrifter! Det er ikke så forskelligt fra et almindeligt mønster, det hjælper hækleren til faktisk at tænke sig om to gange, fysisk tage tøjet op til kroppen og måle med, få en fornemmelse af hvor meget det giver sig, og generelt være mere bevidst i processen og mindre lænket til bare blindt at følge en opskrift, som måske ikke virker for deres kreative hjerner. Derudover er det nemmere at freestyle med en intuitiv opskrift!
Jeg håber du kunne lide dette blogindlæg og jeg ønsker dig alt det bedste på din hæklerejse!
…læs evt om, hvorfor jeg laver intuitive opskrifter her.
Du kan også finde flere blogindlæg om at være kreativ her.
Hækling af tøj, hækling som virksomhed, design og konstruktion af tøj mm:
Hook: 3 mm Yarn: Jute, size 2/sport, 50 g = 100 m. You will need 150 grams. One skein of 50 g in each color. I used purple, coral and cream.
With this crochet pattern you will learn how to crochet a bag that is sturdy with room for your phone, lipbalm and a small purse.
If you are able to, you can donate small or big amounts to say thanks for the pattern, this way I can continue to share free patterns:
Get the pattern for the crochet skirt here, or crochet bikini top here.
The stripes are made at random.
For this version of Selene top I skipped the first rows of the top to make it start under the bust instead of the waist. Folded the first rows and sewed it in place to draw a string through consisting of chainless foundation in sc.
row 1: Chain 5, 1 sc in 2nd ch from the hook 1 sc in the next 3 ch Ch 1 and turn.
row 2: 1 sc in every stitch (chain doesn’t count as a stitch) = 4 sc
Repeat row 2 until you have 80 rows. Break off the yarn.
Now fold it as shown here:
So you have 40 rows on one side and 20 and 20 rows on the other side. Mark both corners. I single crocheted over all 4 stitches.
Now to the back + lid of the bag.
I started with purple. Chain 40+1.
Row 1: Make 1 sc in every stitch, ch 1 and turn = 40 sc
Row 2: Repeat row 1
Row 3: Make 1 decrease by crocheting the first 2 stitches together to 1. Then 1 sc in every stitch, ch 1 and turn.
Repeat row 1, 2 and 3 for 20 rows, making 1 dec at the start of every 3rd row.
Now you start the increase. You increase on every 3rd row by making 2 stitches into the first stitch.
When you have 14 rows of increase, 34 rows in total. Break off the yarn.
For the front of the bag (the piece where the lid is going to be folded down onto)
Repeat what you did for the back, but stop after the 20 rows. Break both or only one yarn end or change color.
Edge – now we need to join the panels. For the edge you only use 1 yarn strand.
Use cream color. Place the side onto the front and single crochet into each row on the bag and side, until you get to the corner.
Make 1 extra stitch through the corner and through the bag before continuing with 1 stitch through every stitch/every row, on the bottom of the bag, then again 2 stitches in the corner, continue up to the other side of the bag finishing by making 1 sc into each of the 4 sc on the top side of the bag.
Do the same with the back of the bag, also crochet an edge with sc over the lid of the bag and opening. 1 sc per row, 1 sc per sc. Finish with 1 ss in the first sc, break off the yarn.
Make a strap the following way:
Start with 1 strand of yarn. Insert the hook in the side of the bag, not under the sc edge but further down into the stitch below to make it more secure. Make 1 ss. Hook through the next stitch, yarn over, pull through (2 loops on hook), yarn over, pull trough 1, yarn over, pull through both loops, continue like this:
This is a chainless foundation with sc. Repeat for 33 stitches. Change color. Repeat for 30 stitches. Change color and repeat for 25. Yarn over, pull through both loops. Break off the yarn and sew the other end of the strap in place on the other side.
I used purple, white and coral.
Magnets
Take two magnets and place them where you want it. Sew up and down through the stitches and across the magnet to keep it in place. Don’t cover it too much as it won’t hold.
With the other magnet you might want to only sew in the top of the stitches to make it invisible on the front of the bag.
Weave in the ends and block the bag by making it wet (you can even add regular liquid glue and make a water bath with a little water and like 1-2 tbsp glue) and then shaping it and pressing it dry on some newspaper (i you use water like me), or plastic bag if you use glue. Leave plastic or newspaper inside as well to help shape the bag and then leave it to dry overnight.
If you like stripes check out these cute crochet patterns:
Here’s a simple video tutorial for crocheting a bra cup using the double crochet stitch:
In this tutorial, you’ll learn how to crochet a bra cup using the double crochet stitch. This technique involves crocheting in rows back and forth, with increasing and decreasing on one side of the row, until you achieve your desired bust width and bust depth.
If you are able to, you can donate small or big amounts to say thanks for the pattern, this way I can continue to share free patterns:
You can use a 3 mm hook (or any hook you prefer) and cotton yarn, size 1, superfine, fingering, with 50 g = 170 m (or any yarn that matches the hook size).
Hook: 3 mm (or any hook you’d like) Yarn: Cotton, size 1, superfine, fingering. 50 g = 170 m. (or any yarn that fits the hook size!)
this is super simple – you are crocheting in rows back and forth only increasing/decreasing on one side of the row, until you have your bust width and bust depth. Watch video below to learn the rechnique:
I use this for many of my crochet tops. Follow along in the pattern or video below or buy crochet pattern for my popular design Mirabel top here.
With this crochet pattern you can create any top design you’d like, add single crochet, shell stitch or whatever, for the body or make it into a dress! You can sell the products if you like, just be sure to link to www.matidenmark.com or @mati_denmark.
If you are able to, you can donate small or big amounts to say thanks for the pattern, this way I can continue to share free patterns:
Always remember to try on as you go!
Hook: 3 mm (or any hook you’d like) Yarn: Cotton, size 1, superfine, fingering. 50 g = 170 m (or any yarn that fits the hook size!)
YOUR MEASUREMENTS
try turning the bra cup sideways for a different shape and look!
Measurement 1: Bust depth + 1 cm Measured from under the bust to the fullest part of the bust/nipple
Measurement 2: Bust width Measured over one breast – from one side to the other
BRA CUP
You increase by making 3 sc in the middle stitch on every row until you have measurement 2. Half way through the last row you make the strap.
Row 1: Chain until you have measurement 1. The last chain is the turning chain. Make 1 sc into every chain, 3 sc into the last chain. Mark the 2nd sc (this is your middle stitch).
Continue on the bottom side of the row with 1 ss in every stitch (you don’t crochet into the first stitch where you made the 3 sc). Ch 1 and turn over.
Row 2: Make 1 sc in every slip stitch – through both loops. When you reach the 3 sc crochet you make: 1 sc in the front loop of the first stitch (you only go through the front loop this one time), 3 sc in the next stitch (the middle stitch), 1 sc in the next stitch and 1 sc into every stitch on the row. Ch 1 and turn over.
Row 3: Make 1 sc in every stitch, 3 sc in the middle stitch, 1 sc in every stitch, ch 1 and turn over.
Rk 4-xx: Repeat row 3 until the widest part of your bra cup matches measurement 2. Stop when you are halfway on the bra cup. Make 1 sc into the middle stitch. Now you crochet the strap.
STRAPS
Two sets of straps: Chain until you have about 60 cm.
One set of straps: Chain until you have 120 cm. 135 cm if you want the top to be longer than 10 cm.
Make 1 ss into every chain and when you return to the bra cup make 1 sc in the middle stitch. Then 1 sc into the rest of the stitches on the bra cup. Break off the yarn. Make one more bra cup + strap. When you reach the corner, chain 1 and turn the bra cup upside down so you crochet over the rows.
For a wider strap simply start the strap a few stitches before the middle of the top of the bra cup.
How about adding my unique self-made stitch, ternion stitch for the body? Watch the free tutorial here: