Posted on Leave a comment

Free crochet pattern guide: How to crochet Keri dress in stripes

Follow Keri skirt to make this dress (and make adjustments as followed)

And increase just as often but with twice as many stitches and use treble crochet instead of hdc. Skip the waist elastic part as you don’t need extra rows to be folded around the elastic as you crochet on the opposite side of the row for the top part.

You start with a chainless foundation with treble stitch.

Before getting started:

Hook: 3 mm
Yarn: Superfine/fingering. 50 g = 160 m and/or sport/fine 50 g = 140 m. Choose the colors you like, or one color.
Stitches: Treble crochet, chain 3 at the end of every round (turning chains).
Switch yarn color: By bringing the new color in at the very last stitch of the old color (when you pull the yarn through at the end of the round when you slip stitch into the first stitch on the round). Then chain 3 in the new color (turning chains)
You will also need: A needle to sew in the ends and alternatively some neutral colored (similar to your skin tone) fabric to sew into the top/skirt. I used a rectangle for just the bust and sewed with needle and thread all around the edge and through the crochet dress on the wrong side. You can also wear a slip dress under or neutral colored underwear – or use it as a beach cover up dress.

How to always make stripes look good

I chose beige, two shades of blue, silver (that looks blue when paired with these colors!) and some sparkly yarn that I only crocheted in sc (simply because I didn’t have a lot of it and wanted to save some).

You can just mix the stripes at random and just leave the yarn end at the beginning of the row and pick it up later, as you work in the round. In the end you can just tie knots on the loose yarn and leave them hanging – you can also weave them in if you like, but it’s not necessary. Just make sure that when you do change color, that you make sure the yarn is always on the wrong side of the dress, so you don’t end up with yarn strands on the right side.

I like to always add a neutral color (white or beige or cream) between each color change, but sometimes I have switched it up and made two shades of blue/silver or beige/white after each other – this works best with similar colors, if I was using contrast colors I would have definitely seperated them with a beige color.

I had a shade of blue that I wasn’t a big fan of, so I only added a hdc row with it twice throughout the whole dress and I generally try and switch colors often.

When you have made the skirt part

Try on the skirt – make sure you put it onto the body to see where it sits on you. Is the waist tight to your waist? if not move the skirt down a bit, if it fits your waist well you can continue to crochet rows but now on the other side of your very first row. Insert your hook, chain 3 and start crocheting through the loops on the top of your row.
Crochet until you have the length you need for a dress. If your waist is smaller than the skirt opening, then do decreases – exactly how often and many increases you did, now you just crochet 2 stitches together to one instead of making 2 stitches in the same stitch. Decrease until it fits your waist. Continue with regular rows of no inc/dec (if you are pear shape like me. OR start increasing when you reach the bust. Increase the same as you did on the skirt, try on as you go and make sure you only increase until you have enough width for your bust.

Then do regular rows if needed at the end. Break off the yarn when you have the length you want. Tie knots on the ends inside the dress and weave in the other ends.

The straps

Then do a chainless foundation with single crochet for the straps. Approx. 1/3 of the way into the dress from the side. Make approx. 50 sc stitches in chainless foundation directly out from the dress. Make sure to try it on and put the strap over your shoulder – stretch it! Add or remove stitches if needed. Slip stitch to the opposite side of the dress – lay the dress flat to see where it should go or slip stitch while wearing it. Do the same with the other strap. Weave in the ends.

The lining

Now you can add a neutral colored piece of fabric if you want and hand sew through the edge all around into the inside of the dress. You can also use an old jersey t-shirt and cut it into a tube. Then sew the sides to the sides of the dress and also the top opening into the dress as well, so it stays in place.
I only added a piece for the top part.

Congrats, now you made a super cute every-day striped dress for summer! Make sure to tag @mati_denmark and tag #KeriDress if you share this on social media. s

Posted on Leave a comment

Free pattern guide: Selma dress with shell stitch

Follow pattern for Selma dress but use 2 strands of superfine/fingering cotton and a 4,5-5 mm hook.
Tension: 10 cm = 9 rows x 21 stitches

Get the rose pattern here, free headband pattern here and free pattern for handbag here (this is just made with cotton and a wide strap (same width as the sides and bottom AND blocked with glue and water after).

The shell stitch edge

First you make sure the dress is closed in both sides (no slits). Then you use 2 strand still but a 6 mm hook and treble stitch (yarn over twice).

Insert the hook in the side of the dress, chain 2 or 3). Make 5 tr around the first row, make 1 sc around the 2nd or 3rd row. How to know where to sc? Put the shell down onto the row and make sure it’s not too stretches or too loose, then make a sc whereever. 5 tr around the next row, 1 sc around the 2nd row or so. Pay attention to the fact that you can crochet around a row (dc stitch) or in the hole between two rows – you do you – you can’t do it wrong. If the edge seems too tight, unravel that bit and make your sc closer to the shell and vice versa.

Then when you reach the beginning just make sure you have distributed your stitches so you don’t end up with two shells directly next to each other.

Now do the same thing for the top of the dress – distribute the shells – it’s OK if it’s not perfect – I for instance have 2 shells on one side of my v-neck but 3 shells on the other side (so I have 5 shells in the neckline spread out) – and it’s OK – it still looks good. To avoid extra length on the strap I just made sure that I made the single crochet on the points of the top of the dress (where the straps would be sewn on). But you can also make the shell on the points if you like.

The straps

Before adding straps make chains and a shell stitch edge (I made 6 shell stitch).

Use a 6 mm hook and two strand of superfine/fingering cotton.

You start with a long yarn end (to sew on the strap in the end). And then you chain.

Follow mine or add more/less chains depending on your size (try it on).

Chain 28, make 5 tr in the 4th ch from the hook, 1 sc in the 5th ch from the hook, 5 tr in the next ch, 1 sc in the 5th ch etc. Finish with 5 tr in the last stitch. Add 6 chains for each shell (or remove 6 chains if you need less).
My strap measures: 40 cm (incl stretch). So 1 shell measures approc. 6,6 cm.

When you reach the end crochet on the bottom side of the row: 5 tr in the shell from the row before, 1 sc in the sc. Finish with 1 ss in the first tr in the round. Try on the strap with a safety pin or something to see it the length fits you, otherwise add more shells/chains. Break off but leave a yarn end to sew it on. Make one more like it.

Sew or crochet the strap on over 4 stitches or so.

Posted on Leave a comment

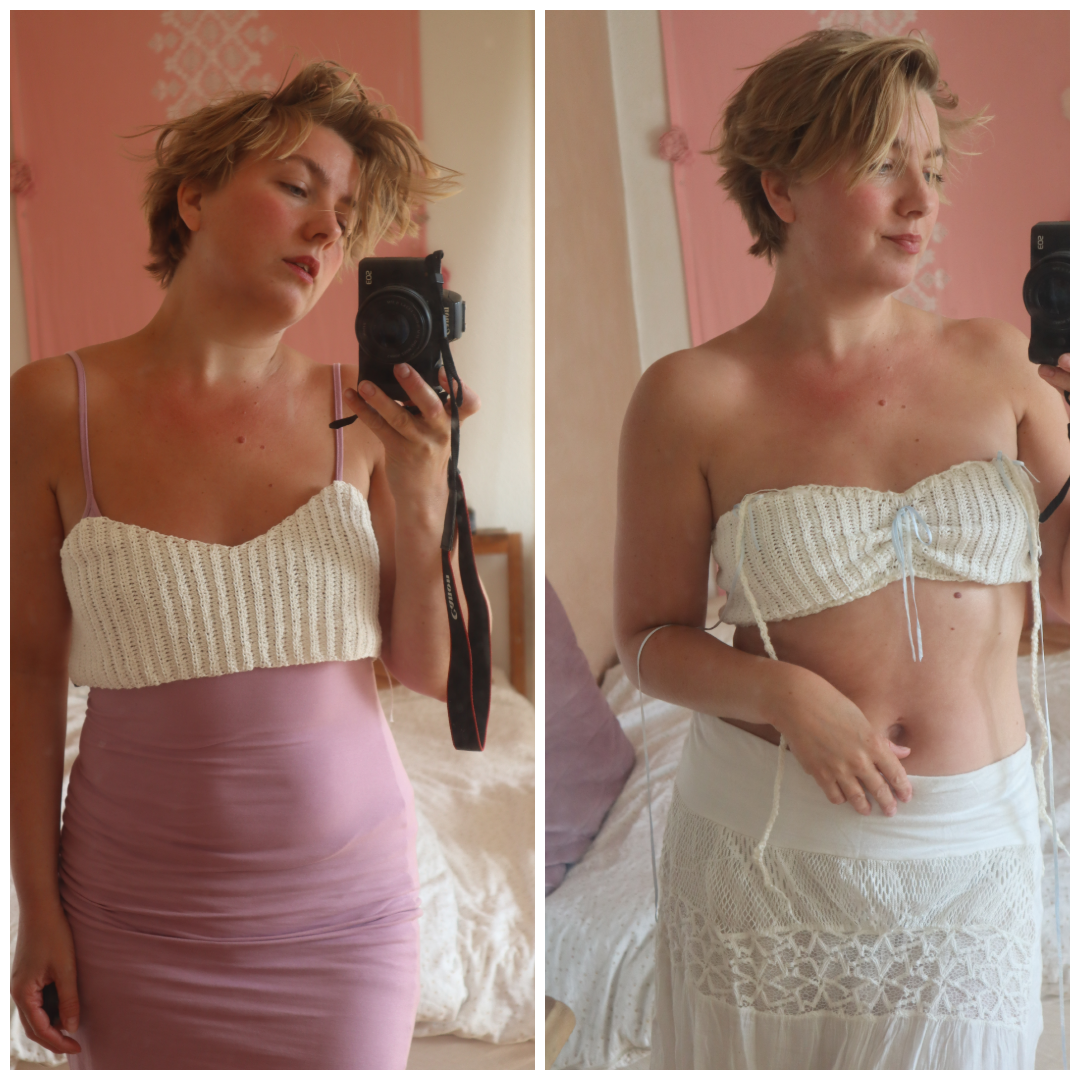
Free crochet guide How to crochet ruffle bralette with ribbons

You will need to follow Zoey top in order to make this version, but you don’t need to subtract from your measurements. We need the extra fabric. I used the same yarn and hook as the pattern, but I also used some baby blue ribbon yarn and some white bouclé yarn for the edge – simply because I only had secondhand yarn. The bouclé added another shade of white and also a different texture, I liked that. For the top I even used two different shades of white – it’s okay – an imperfect top is just as beautiful.

The following is the process I made the top.

Now to make the ruffles & add the elastic:

Take 2 pieces of children’s elastic (0,5 cm wide), wrap it around your under bust and over bust, tie a knot – you want it to fit tightly, but comfortably – you can always tie another knot later on if needed (after the elastic is added).

Crochet a hdc edge around the top (top and bottom) by making approc 2 hdc per row (1 per row + 1 between each row) while crocheting around the elastic – see my video tutorials for reference.

The bows:

Find some ribbon yarn (or literal ribbon) then make two bows and sew them onto the front (the points of the top) Take 4 long strands – the longer the better – and sew them each to the inside of the top – on the front and back.

The straps:

Crochet a long straps using sc chainless foundation from each of the points of the top (in front of the ribbon/behind the bow) until you have enough length to tie the strap on the shoulder.

The front scrunch:

Take a long piece of ribbon and weave it through the front of the top – through two rows – parallel to each other (from the bottom and up) and tie them to a bow on the front of the top so you can scrunch the top together.

And you’re done!

(Bonus: embrace the imperfection of loose ends, and leave the ends of yarn from where you crocheted the straps).

If you like romantic crochet clothes, you might also like these patterns:

Posted on Leave a comment

How to crochet boat neck top in wavy stripes – inspired by the one Elle Woods wears while studying

Ever since I noticed how well boat necks fit me, I have been paying attention to boat neck tops in tv and film, and when I was rewatching Legally Blonde for the 20th time the other day, I fell in love with a striped blue-greenish top that Elle Woods is wearing while studying for the LSATS. She sits on the floor reading a book and wears jeans and a belt and has loose hair. sYou can check out the scene here.

To make this top – follow Helena top

How to make those wavy stitches

What I love so much about this top is that you can’t really crochet anything wrong per say – just follow the pattern for Helena top, make the foundation in dc and then start switching between hdc and dc. When you get to the next row either make hdc into hdc (look at the row below you whether it’s a small or big stitch), dc into dc OR do the opposite and make hdc into dc and dc into hdc. One will make the row look kinda crooked and the other make it look wavy – I did a bit of both and even just switched it up on one row – this means that you don’t have to think much, you can just kinda crohet whatever – make 10 hdc after each other then make 1 dc, 1 hdc, 1 hdc, 1 dc – like just do it completely random if you want.

How to always make stripes look good

The same goes for the stripes, yarn weights and colors – I chose beige, two shades of green, silver (that looks blue when paired with these colors!) and some sparkly yarn that I only crocheted in hdc (simply because I didn’t have a lot of it and wanted to save some). You can go for fine/sport like I did but with the hook size you can also use worsted or even bulky yarn – it’ll work great as well and give even more unique texture and enhance the wavy look even more. Especially if you use some sparkly bouclé yarn as I did, it makes if look really unique.

Again, you can just mix the stripes at random and even just leave the yarn end at the beginning of the row and pick it up later, as you work in the round. I like to generally always add a neutral color between each color change, but sometimes I have switched it up and made two shades of green after each other – this works best with similar colors, if I was using contrast colors I would have definitely seperated them with a beige or silver color.

Have fun with it!

Play around and have fun, this is the most unique top made from such a simple pattern. The pattern comes in three sizes but you can easily size it up, by just adding more stitches and rows – and try it on as you go. I made it in size S, the sizes are made to be on the bigger side, or at least make the top fit more loosely, which I like with this one, because the stitches are see-through.

You can wear a top under, or even just sew a piece of fabric on the inside to cover the breast area if you want (or wear a neutral colored bra).

I think this top will look so good with jeans but also a midi skirt.

Posted on Leave a comment

Free Crochet Pattern Guide: Daphne Shorts Crochet shorts in shell stitch

I made this version of Daphne pants as shorts and adding more width to the shorts for a slightly more A-line shape. You can add more increases – just try the panel on your body as you go or fold the panel in half and look at the angle of the shorts.

Buy crochet pattern:

How to crochet shorts with A-line legs and waist tie.

Pair it with a similar colored top like Ayala top made in cotton.

Hook: 6 mm
Yarn: Bouclé, size 3, 50 g = 90 g. Brand: Hjerte Twist. I used 4 yarn balls for my size Small shorts.

Start with a chainless foundation with dc. Then follow the pattern and measurements of the Daphne shorts but measure the panel up against your hip as you go. When you reach the beginning of your hip you start increasing the following way: On the middle of the row when making 1 shell, add another shell + 1 chain. Make your shell as usual, then chain 1, make 3 more dc into the same sc. Then continue as before.
When you come back to the middle of the row you make 3 dc around the chain (as though it was a sc).


I firstly had 21 rows (incl. chainless foundation) then made 1 increase, then 2 regular rows, 1 inc, 4 regular rows, 1 inc. Then continued with regular rows for a couple more rows. You can also make 1 inc on every 3rd row or so. The inc won’t be exactly in the middle stitch, but that’s okay because the stitches will blend into each others anyways making it not visible where the increases are.

When you are satisfied wih the length/width of your shorts (when you have the length equivalent to the meas. from waist to crotch) make the crotch part but only make 2 rows (or about 2-3 cm) of short length.

Finish with 1 row where you make 5 dc into every sc and 1 sc into every 2nd dc to make the edge more flared. Break off the yarn and make the other panel. Crochet or sew them together, then crochet a few rounds of dc in the waist, grab a 3 cm wide elastic band and sew it together, then crochet or sew the dc rows around the elastic band.


Tightly chain until you have a long waist tie, fold in half and twist it into itself and weave into the waist.

Posted on Leave a comment

Free Crochet Pattern Guide: Chunky Carrie Dress with scoop back

Buy the crochet pattern here:

How to make a backless crochet bodycon dress:

Hook: 6 mm
Yarn: Bouclé, size 3, 50 g = 90 m. I used the brand Hjerte Twist
I used 6 yarn balls (300 g) for my dress. I am 88 cm in bust, 104 in hip, 168 cm tall (size M-L).

Follow the instructions from Carrie dress. When you reach the back make double the amount of decreases, so you start and end the row by skipping the stitch. When the row is small enough to fit from one side of your breast to the other you stop. Make more rows without decreases if needed, otherwise move to the straps.

Make a chainless foundation by inserting your hook in the next stitch/side of the dress, yarn over, pull through, yarn over, pull through 1 loop, yarn over, pull through both loops. Stop when you have approx. 100 stitches or enough so that the strap can be weaved once through the side of the dress. Break off the yarn and do the same on the other side o the dress.
Approx. 1/3 down the top, insert the strap and then tie it on the back.

You can also try out this crochet top pattern which is quite similar:

Posted on Leave a comment

Free Crochet Pattern Guide: Calliope Mesh Top with Long Sleeves (no sew crochet pattern)

affiliate

Buy the crochet pattern here:

How to crochet a long sleeved ballerina eyelet top

First of all you will need to follow the pattern for Calliope top to make this long sleeved version. Follow the instructions in the crochet pattern but instead of regular size 1 cotton you will need a thicker yarn size. I used 8 PLY, 50 g = 120 m, this one as well as a size 3 mm for the body and 4,5 for the sleeves.

Hook: 3 mm and 4,5 mm
Yarn: Cotton blend, 8 PLY, 50 g = 120 m.
Stitches: Same as the Calliope pattern, though for the sleeves it is a mix of hdc for the regular rows and dc for the mes rows (made the same way as the original pattern.)

After finishing the body of the top you are making an edge but instead of the thick strap you are making a long row of single crochet chainless foundation, about 100 stitches or how long you want it to be. Break off the yarn and make the same strap on the other side of the top.

I have approx. 45 rows in my armpit.

Sleeves

Insert your 4,5 mm hook in the first row in your armpit with 1 ss and ch 2. Now make 1-2 hdc per row all around the armpit and finish with 1 ss in the first st, ch 2 and turn. (you always ch 2 and turn).

I had approx. 52 stitches in my first row. Continue wih hdc, for a total of 8 rounds. Meanwhile over these 8 rows, make 1 decrease on every row (also try on the sleeve as you go), decrease more or less if needed. Make sure your number of stitches in an even number for the 8th round so you can make the mesh row. The mesh row always need to have an even number of stitches for the pattern to work.

Then make a row with mesh dc: 1 dc, ch 1, skip one stitch.

Then make 4 rounds of regular hdc by making 2 hdc into every hole.
1 round of mesh.
8 rounds of hdc, 1 round mesh, 4 rounds of hdc.


Decrease more if needed, I stopped decreasing after the first 8 rounds. You can also just make your armpit tight or make fewer stitches in the first round in the armpit.

Our arms are different in shape and length, so make sure to try as you go. You can also just make a straight sleeve with no inc/dec.

Continue until you have the length you want, then finish with a mesh row and then a row with a slight flare where you crochet 3 dc into every hole in the mesh, break off the yarn and do the same thing on the other sleeve.

Get the free crochet bag pattern here.

I just used regular cotton for this version.

Posted on 6 Comments

Free Crochet Pattern How to Crochet a Marilyn Monroe Cable Sweater

Find more free crochet patterns here >>

Learn How to Crochet a Marilyn Monroe Cable Sweater with Ribbed Collar Edge and Crochet Cables:

Read on below to learn how to crochet the tight fitted Marilyn Monroe cable sweater..

If you are able to, you can donate small or big amounts to say thanks for the pattern, this way I can continue to share free patterns:

Click here to get the pattern

Check this post and be inspired by Marilyn Monroe’s style (crochet clothes edition)

Marilyn Monroe crochet clothes inspo

If you like old fashioned crochet patterns, check out these (click the photo):

How to crochet the classic vintage inspired Marilyn Monroe cable sweater with ribbed edges and collar:

This one uses vegan materials, but you can also make it in wool.

Remember to follow along with the video to help you crochet the sweater:

If you like vintage clothes and especially crochet sweaters inspired from clothes from the 1940’s then try this crochet pattern for a unique sweater with ribbed stitches and wide shoulders, which is a typical shape for 1940’s tops and jumpers:


Posted on Leave a comment

Free Crochet Pattern Guide: Jolene lace top

Buy the crochet pattern here:

How to crochet a see-though lace cowl neck top:

  1. Follow the pattern for Jolene top
  2. Use a 4,5 mm hook and superfine cotton: 50 g = 160 m. I used 46 g for my size S/M incl. bra cups.
  3. Use Ternion stitch and make them ON TOP of each other if you want it like my version.
  4. Increase 2 per row: Increase by making 1 ternion stitch in the same stitch: *dc, sc, ch*
  5. If you want you can make an edge on each side with approx. 2-3 sc around every row.
  6. Bra cups: If you don’t want to use nipple covers make a small version of a bra cup (try it on as you go). It just needs to be big enough to cover a little bit more than the nipple area.
  7. Put on the top and secure the bra cups with a safety pin where you want them.
  8. Then sew them in place through the stitches.
  9. For the cowl you can simple tie a piece of yarn around the rows and weave them in.

Other crochet patterns you might like:

Posted on Leave a comment

Free Crochet Pattern Guide: Flared Keri Skirt

Buy the crochet pattern here:

How to crochet skirt with flare and double crochet:

  1. Follow Keri skirt but use double crochet
  2. Increase the same amount of stitches but increase on every other row instead.
  3. Top: Florence top with hdc (free pattern guide here)

Other crochet patterns you might like: