Posted on Leave a comment

Free crochet pattern: How to Crochet a Striped Handbag

Find more free crochet patterns here >>

Hook: 3 mm
Yarn: Jute, size 2/sport, 50 g = 100 m. You will need 150 grams. One skein of 50 g in each color. I used purple, coral and cream. 

With this crochet pattern you will learn how to crochet a bag that is sturdy with room for your phone, lipbalm and a small purse.

If you are able to, you can donate small or big amounts to say thanks for the pattern, this way I can continue to share free patterns:

Get the pattern for the crochet skirt here, or crochet bikini top here.

The stripes are made at random.

For this version of Selene top I skipped the first rows of the top to make it start under the bust instead of the waist. Folded the first rows and sewed it in place to draw a string through consisting of chainless foundation in sc. 

Everything is made with 2 strands of yarn in the same color, expect for the edge and strap.

Get bikini here and skirt here

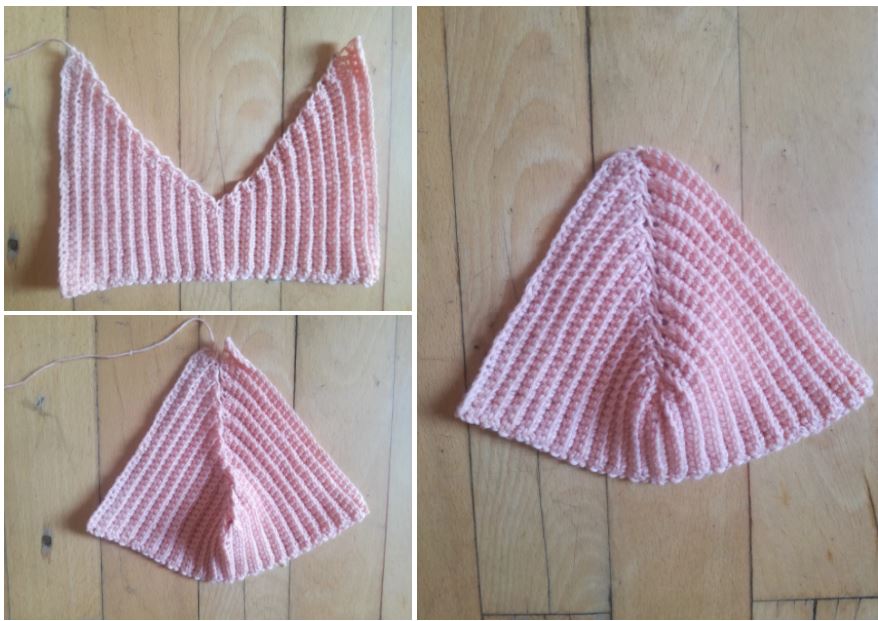
Start by making the side:

I used coral. 

row 1:
Chain 5, 1 sc in 2nd ch from the hook 
1 sc in the next 3 ch
Ch 1 and turn. 

row 2:
1 sc in every stitch (chain doesn’t count as a stitch) = 4 sc

Repeat row 2 until you have 80 rows. 
Break off the yarn. 

Now fold it as shown here:

So you have 40 rows on one side and 20 and 20 rows on the other side.
Mark both corners. I single crocheted over all 4 stitches. 

Now to the back + lid of the bag. 

I started with purple. 
Chain 40+1. 

Row 1:
Make 1 sc in every stitch, ch 1 and turn = 40 sc

Row 2:
Repeat row 1

Row 3: 
Make 1 decrease by crocheting the first 2 stitches together to 1. Then 1 sc in every stitch, ch 1 and turn. 

Repeat row 1, 2 and 3 for 20 rows, making 1 dec at the start of every 3rd row. 

Now you start the increase. You increase on every 3rd row by making 2 stitches into the first stitch. 

When you have 14 rows of increase, 34 rows in total. Break off the yarn. 

For the front of the bag (the piece where the lid is going to be folded down onto)

Repeat what you did for the back, but stop after the 20 rows. Break both or only one yarn end or change color.

Edge – now we need to join the panels. For the edge you only use 1 yarn strand.

Use cream color. Place the side onto the front and single crochet into each row on the bag and side, until you get to the corner. 

Make 1 extra stitch through the corner and through the bag before continuing with 1 stitch through every stitch/every row, on the bottom of the bag, then again 2 stitches in the corner, continue up to the other side of the bag finishing by making 1 sc into each of the 4 sc on the top side of the bag.

Do the same with the back of the bag, also crochet an edge with sc over the lid of the bag and opening. 1 sc per row, 1 sc per sc. Finish with 1 ss in the first sc, break off the yarn.

Make a strap the following way:

Start with 1 strand of yarn. Insert the hook in the side of the bag, not under the sc edge but further down into the stitch below to make it more secure. Make 1 ss. Hook through the next stitch, yarn over, pull through (2 loops on hook), yarn over, pull trough 1, yarn over, pull through both loops, continue like this:

This is a chainless foundation with sc. Repeat for 33 stitches. Change color. Repeat for 30 stitches. Change color and repeat for 25. Yarn over, pull through both loops. Break off the yarn and sew the other end of the strap in place on the other side. 

I used purple, white and coral.

Magnets

Take two magnets and place them where you want it. Sew up and down through the stitches and across the magnet to keep it in place. Don’t cover it too much as it won’t hold. 

With the other magnet you might want to only sew in the top of the stitches to make it invisible on the front of the bag. 

Weave in the ends and block the bag by making it wet (you can even add regular liquid glue and make a water bath with a little water and like 1-2 tbsp glue) and then shaping it and pressing it dry on some newspaper (i you use water like me), or plastic bag if you use glue. Leave plastic or newspaper inside as well to help shape the bag and then leave it to dry overnight.

If you like stripes check out these cute crochet patterns:

Posted on Leave a comment

Free crochet pattern How to crochet a simple bra cup in any size “the M bra cup” Unique crochet technique

Find more free crochet patterns here >>

Here’s a simple video tutorial for crocheting a bra cup using the double crochet stitch:

In this tutorial, you’ll learn how to crochet a bra cup using the double crochet stitch. This technique involves crocheting in rows back and forth, with increasing and decreasing on one side of the row, until you achieve your desired bust width and bust depth.

If you are able to, you can donate small or big amounts to say thanks for the pattern, this way I can continue to share free patterns:

You can use a 3 mm hook (or any hook you prefer) and cotton yarn, size 1, superfine, fingering, with 50 g = 170 m (or any yarn that matches the hook size).

Happy crocheting!

Hook: 3 mm (or any hook you’d like)
Yarn: Cotton, size 1, superfine, fingering. 50 g = 170 m. (or any yarn that fits the hook size!)

this is super simple – you are crocheting in rows back and forth only increasing/decreasing on one side of the row, until you have your bust width and bust depth. Watch video below to learn the rechnique:

Posted on Leave a comment

Free crochet pattern How to crochet a triangle bra cup in any size

I use this for many of my crochet tops. Follow along in the pattern or video below or buy crochet pattern for my popular design Mirabel top here.

With this crochet pattern you can create any top design you’d like, add single crochet, shell stitch or whatever, for the body or make it into a dress! You can sell the products if you like, just be sure to link to www.matidenmark.com or @mati_denmark.

If you are able to, you can donate small or big amounts to say thanks for the pattern, this way I can continue to share free patterns:

Always remember to try on as you go!

Hook: 3 mm (or any hook you’d like)
Yarn: Cotton, size 1, superfine, fingering. 50 g = 170 m (or any yarn that fits the hook size!)

YOUR MEASUREMENTS

try turning the bra cup sideways for a different shape and look!

Measurement 1: Bust depth + 1 cm
Measured from under the bust to the fullest part of the bust/nipple

Measurement 2: Bust width
Measured over one breast – from one side to the other

BRA CUP

You increase by making 3 sc in the middle stitch on every row until you have
measurement 2. Half way through the last row you make the strap.


Row 1: Chain until you have measurement 1. The last chain is the turning chain.
Make 1 sc into every chain, 3 sc into the last chain. Mark the 2nd sc (this is your
middle stitch).

Continue on the bottom side of the row with 1 ss in every stitch (you don’t crochet
into the first stitch where you made the 3 sc). Ch 1 and turn over.

Row 2: Make 1 sc in every slip stitch – through both loops.
When you reach the 3 sc crochet you make: 1 sc in the front loop of the first stitch
(you only go through the front loop this one time), 3 sc in the next stitch (the middle
stitch), 1 sc in the next stitch and 1 sc into every stitch on the row. Ch 1 and turn over.

Row 3: Make 1 sc in every stitch, 3 sc in the middle stitch, 1 sc in every stitch, ch 1
and turn over.


Rk 4-xx: Repeat row 3 until the widest part of your bra cup matches measurement 2.
Stop when you are halfway on the bra cup. Make 1 sc into the middle stitch.
Now you crochet the strap.

STRAPS

Two sets of straps: Chain until you have about 60 cm.

One set of straps: Chain until you have 120 cm. 135 cm if you want the top to be longer than 10 cm.

Make 1 ss into every chain and when you return to the bra cup make 1 sc in the
middle stitch. Then 1 sc into the rest of the stitches on the bra cup. Break off the yarn.
Make one more bra cup + strap. When you reach the corner, chain 1 and turn the bra
cup upside down so you crochet over the rows.

For a wider strap simply start the strap a few stitches before the middle of the top of the bra cup.

How about adding my unique self-made stitch, ternion stitch for the body? Watch the free tutorial here:

Crochet bra cup used, is this one.

IF YOU WANT TO CONNECT THE BRA CUPS ON THE MIDDLE.

While crocheting down the side of bra cup 2, place the other bra cup on top and
crochet through both bra cups with single crochet. Break off the yarn.

More patterns you may like:

Posted on Leave a comment

Free Crochet Pattern How to Crochet Moroccan Stone Face Scrubber

Find more free crochet patterns here >>

This is not an authentic Morrocan face scrubber, but inspired by one. I got a hammam treatment and she finished off by scrubbing my face with this Morrocan stone that was wrapped in crochet! So I thought, why not make one myself?

Hook: 3 mm
Yarn: Cotton, size 1/superfine/fingering. 50 g = 160 m.
Stitches: Single crochet, chains and slip stitches (US terms)

If you are able to, you can donate small or big amounts to say thanks for the pattern, this way I can continue to share free patterns:


Start by finding a pebble or stone that is soft and a comfortable size. Preferably in a uniform shape, so it is easier to crochet around it.

Boil and wash it thoroughly, lie in the sun to dry completely. Make sure to find the stone in a natural area, to avoid any chemicals and such. A natural beach or generally in a non-human interferring natural enviornment.

Then get your hook and yarn ready. Chain 4, connect to a ring. Then make 10 sc into the ring, then continue in the same direction. 2 sc into every stitch = 20 sc in the round.

Put your crochet circle onto the rock to see if it is too big/too small. If you need more width continue increasing below, otherwise skip to next step. Increase 10 sc per round by making 1 sc, 2 in the next. Next round move the increase: 1 sc into the 2 next stitches, 2 into the 3rd.

Stop the increase when you have the width that fits the stone. Make sure to stretch the crochet onto the stone! Unravel if you have too much yarn. If your stone has more height to it, make 1 or more rounds with just 1 sc into every stitch.

Don’t put the stone into the crochet yet, wait as long as you can to make it easier.


Then decrease:
1 stitch, 1 decrease. Repeat. Decrease by crocheting 2 stitches together. Continue decreasing like this or by decreasing every two stitches on the round and put the stone into your crochet to see how it fits. If there is too much crochet you can also unravel and skip some stitches. If there is too little, decrease a little less. When the round starts closing in, put the stone into the crochet and continue decreasing on every stitch, you can also sew the hole closed if it is easier for you.

If your stone, like mine, is kind of crooked and needs more stitches on one side of the row, simply stop your round approx. half way, turn with 1 ch and crochet back into every stitch on the round and continue as before. This will leave one side of the round higher than the other. Do it for more rows if needed.


Finish by making 1 ss in the opposite side of the round, then chain approx. 15, ss into the top of the scrubber, then make approc 20 sc into the loop and break off the yarn. Weave the yarn end into the inside of the scrubber.

How to use it:

Wetten the scrubber with warm water, add some face wash (preferably Morrocan or some foamy face wash) into the palm of your hand and massage the scrubber into the soap, or add the soap directly to the scrubber and massage it into it with your hand. Wetten your face and then use the scrubber in circular motions (no force needed). This will leave your skin feeling so soft and look so glowy!


Posted on Leave a comment

Free Crochet Pattern: Crochet Lingerie Underwear Co-Ord Set with Mesh Body and G-String

Find more free crochet patterns here >>

Crochet underwear with lace details and a body-hugging g-string design offers a delicate and alluring look. The intricate crochet pattern combined with the elegant lace creates a stylish and seductive piece of lingerie. The g-string style provides minimal coverage, making it a bold and daring choice for those looking to add a touch of allure to their wardrobe.

How to crochet a lingerie set with g-string and mesh top

This set was inspired by the Mirabel top with a similar mesh stitch.

Buy crochet pattern for Mirabel top here: It can be made in any size, bra cup and length, with multiple back options and room for any bust size.

Get the free pattern for Poppy lingerie set here.

More feminie crochet patterns:

Posted on Leave a comment

Free Crochet Pattern Guide: Chunky Carrie Dress with scoop back

Buy the crochet pattern here:

How to make a backless crochet bodycon dress:

Hook: 6 mm
Yarn: Bouclé, size 3, 50 g = 90 m. I used the brand Hjerte Twist
I used 6 yarn balls (300 g) for my dress. I am 88 cm in bust, 104 in hip, 168 cm tall (size M-L).

Follow the instructions from Carrie dress. When you reach the back make double the amount of decreases, so you start and end the row by skipping the stitch. When the row is small enough to fit from one side of your breast to the other you stop. Make more rows without decreases if needed, otherwise move to the straps.

Make a chainless foundation by inserting your hook in the next stitch/side of the dress, yarn over, pull through, yarn over, pull through 1 loop, yarn over, pull through both loops. Stop when you have approx. 100 stitches or enough so that the strap can be weaved once through the side of the dress. Break off the yarn and do the same on the other side o the dress.
Approx. 1/3 down the top, insert the strap and then tie it on the back.

You can also try out this crochet top pattern which is quite similar:

Posted on Leave a comment

Free Crochet Pattern Guide: Calliope Mesh Top with Long Sleeves (no sew crochet pattern)

affiliate

Buy the crochet pattern here:

How to crochet a long sleeved ballerina eyelet top

First of all you will need to follow the pattern for Calliope top to make this long sleeved version. Follow the instructions in the crochet pattern but instead of regular size 1 cotton you will need a thicker yarn size. I used 8 PLY, 50 g = 120 m, this one as well as a size 3 mm for the body and 4,5 for the sleeves.

Hook: 3 mm and 4,5 mm
Yarn: Cotton blend, 8 PLY, 50 g = 120 m.
Stitches: Same as the Calliope pattern, though for the sleeves it is a mix of hdc for the regular rows and dc for the mes rows (made the same way as the original pattern.)

After finishing the body of the top you are making an edge but instead of the thick strap you are making a long row of single crochet chainless foundation, about 100 stitches or how long you want it to be. Break off the yarn and make the same strap on the other side of the top.

I have approx. 45 rows in my armpit.

Sleeves

Insert your 4,5 mm hook in the first row in your armpit with 1 ss and ch 2. Now make 1-2 hdc per row all around the armpit and finish with 1 ss in the first st, ch 2 and turn. (you always ch 2 and turn).

I had approx. 52 stitches in my first row. Continue wih hdc, for a total of 8 rounds. Meanwhile over these 8 rows, make 1 decrease on every row (also try on the sleeve as you go), decrease more or less if needed. Make sure your number of stitches in an even number for the 8th round so you can make the mesh row. The mesh row always need to have an even number of stitches for the pattern to work.

Then make a row with mesh dc: 1 dc, ch 1, skip one stitch.

Then make 4 rounds of regular hdc by making 2 hdc into every hole.
1 round of mesh.
8 rounds of hdc, 1 round mesh, 4 rounds of hdc.


Decrease more if needed, I stopped decreasing after the first 8 rounds. You can also just make your armpit tight or make fewer stitches in the first round in the armpit.

Our arms are different in shape and length, so make sure to try as you go. You can also just make a straight sleeve with no inc/dec.

Continue until you have the length you want, then finish with a mesh row and then a row with a slight flare where you crochet 3 dc into every hole in the mesh, break off the yarn and do the same thing on the other sleeve.

Get the free crochet bag pattern here.

I just used regular cotton for this version.

Posted on Leave a comment

How To Dress For Your Body Shape (Crochet Edition)

this post is made using AI

When dressing according to different body shapes, it’s essential to consider how to complement and highlight your natural features. Here are some general guidelines for various body types:

Apple Body Shape

Individuals with an apple-shaped body tend to carry excess weight around their abdomen, rather than evenly distributed throughout their body. This body type is also referred to as “android” or “O-shaped” due to the appearance of the body silhouette.

  • Empire waist tops and dresses help create a more defined silhouette.
  • Flowy, loose-fitting tops can provide comfort while still looking stylish.

Triangle Body Shape

A triangle shape body, also known as a pear shape, is characterized by narrow shoulders and a smaller bust, with the hips and thighs being broader.

  • A-line skirts and wide-leg pants can balance out the hips.
  • Boat necklines and statement tops draw attention upward.

Inverted Triangle Body Shape

Individuals with an inverted triangle body shape typically have broader shoulders and a narrower waist and hips. This body shape is often characterized by well-defined shoulders and a bust that is larger than the hips.

  • V-neck tops and dresses elongate the upper body.
  • Flared pants and full skirts can add volume to the lower half.

Rectangle Body Shape

A rectangular body shape is characterized by a straighter figure, where the bust, waist, and hips are fairly uniform in width.

  • Clothes that create the illusion of a defined waist, such as belts or A-line dresses, are suitable.
  • Wrap tops and peplum styles can also help add curves.

Hourglass Body Shape

The hourglass body shape is characterized by having a well-defined waist, with the bust and hips being relatively wide and of similar width. This results in a balanced silhouette with curves in all the right places. Many consider this body shape to be the most classic and feminine, and it’s often associated with a more traditional standard of beauty.

  • Fitted styles that accentuate the waist, like wrap dresses or tailored jackets, are flattering.
  • Structured garments that maintain balance between the upper and lower body are recommended.

Remember, these are just starting points, and personal style and comfort should always take priority. Confidence in what you wear can often be the most flattering aspect.

This post is created with the use of AI.

Posted on Leave a comment

Free Crochet Pattern Lip Balm Holder with Beads

Find more free crochet patterns here >>

How to crochet a lip stick or lip balm holder as a keychain with beads.

If you are able to, you can donate small or big amounts to say thanks for the pattern, this way I can continue to share free patterns:


Hook : 3 mm
Yarn: Cotton, size ,1/superfine.
Beads: 69 glass beads
Bead needle to get the beads on the yarn.

First add the beads to the yarn before crocheting anything.
Push down the beads so you have space to crochet.
You can also just add the beads randomly, just make sure you always crochet on the wrong side so the beads will be visible on the right side. Always crochet in the same direction

Round 1: Ch 4, connect to a ring with 1 ss in the 4th ch from the hook, ch 1, 8 sc in the ring. Continue in the same direction.

Round 2: 1 sc in the first sc, 2 sc in the next. = 12 sc on the round

Round 3: Bring 1 bead up to the stitch, make 1 sc. repeat. 1 bead, 1 sc = 12 sc and 12 beads.

Round 4: 1 sc in every stitch (no beads)

Round 5: Bring 1 bead up to the stitch, 1 sc in the next two stitches. repeat. 1 bead, 2 sc. = 6 beads on the round

Round 6: 1 sc in every stitch, no beads.

Round 7-11: repeat round 3-6, so you have 3 rounds with 2 beads and 2 rounds with 6.

Round 12-13: repeat round 6 so you have a gap with no beads.

Round 14-16: repeat round 5, 6 and 3. So you have 1 round with 6 beads, 1 with none and 1 with 12.

Round 17-19: Crochet rounds with no beads until you have the length you need. I made sure the lid of the lip balm was still visible so I can easily remove it but the lip balm is still in place.

Make sure to stretch the holder if it is very tight.


Finish the following way. ch 20, add the last 3 beads, ch 20, break off the yarn and weave in the ends.
Add the lip balm into the holder, then take the chained string and pull it through the stitch on the opposite side of the round, pull the beads through too, to hold it in place. Now you have a loop so you can add your key ring. You can also tie a knot if the beads don’t hold.

Watch this tutorial to see how to crochet with beads:

Posted on Leave a comment

Free Crochet Pattern How to Crochet Wrap Sweater

Find more free crochet patterns here >>

If you are able to, you can donate small or big amounts to say thanks for the pattern, this way I can continue to share free patterns:

Click here to get the free crochet pattern

Other crochet patterns with wrap and waist tie: